
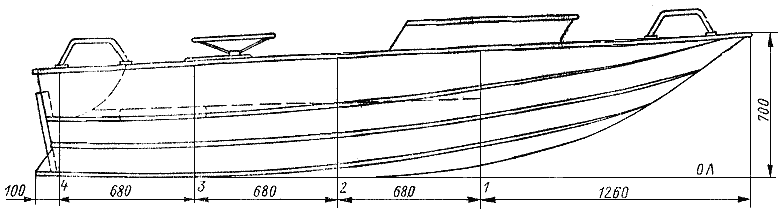
Motorboat «Rainbow-34». Project for self-construction

| Basic data of the «Rainbow-34» motorboat | |
|---|---|
| Length, mm | 3400 |
| Width, mm | 1700 |
| Side height, mm | 700 |
| Body weight, kg | 70 |
| Motor power, hp (kW) | 20 (15) |
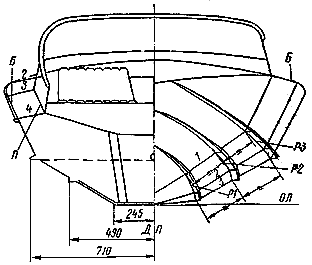
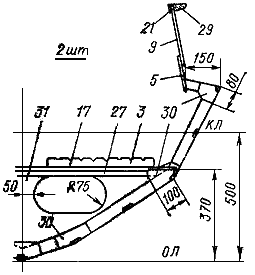
Theoretical drawing, general view and layout diagram of the motorboat
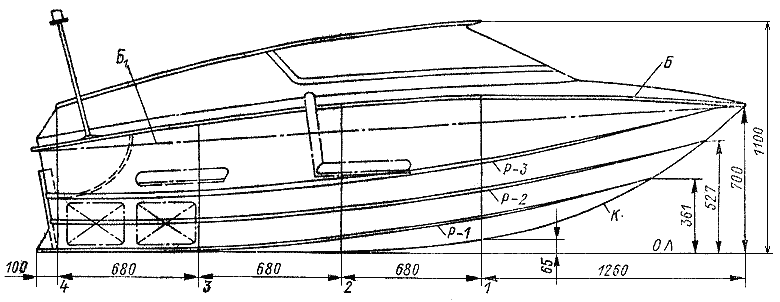
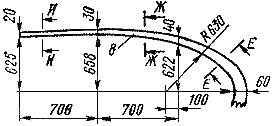
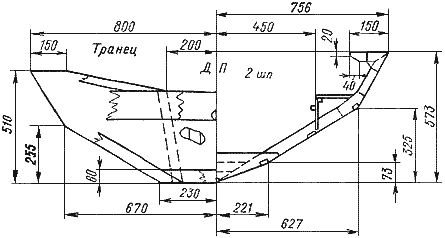
| Table of plasma ordinates | |||||
|---|---|---|---|---|---|
| Frames | |||||
| 1 | 2 | 3 | 4 | ||
| Height from OL, mm | Board-B | 740/552 | 700/573 | 617/530 | 500/510 |
| Deck-P | 774 | 734 | 651 | 534 | |
| Redan-1 P-1 | 174 | 73 | 15 | 0 | |
| Redan-2 R-2 | 302 | 199 | 140 | 125 | |
| Redan-3 P-3 | 430 | 325 | 265 | 250 | |
| Half-width from DP, mm | Board-B | 682/679 | 823/756 | 850/806 | 801/800 |
| Deck-P | 532/469 | 673/606 | 700/550 | 651/650 | |
| Redan-1 P-1 | 179 | 221 | 230 | 230 | |
| Redan-2 R-2 | 348 | 425 | 448 | 450 | |
| Redan-3 P-3 | 520 | 627 | 667 | 670 | |
| P-1 | X | 13 | 15 | 15 | 15 |
| Y | 9 | 9 | 9 | 9 | |
| P-2 | X | 40 | 40 | 40 | 40 |
| Y | 29 | 26 | 24 | 23 | |
| P-3 | X | 38 | 40 | 40 | 40 |
| Y | 25 | 30 | 30 | 30 | |
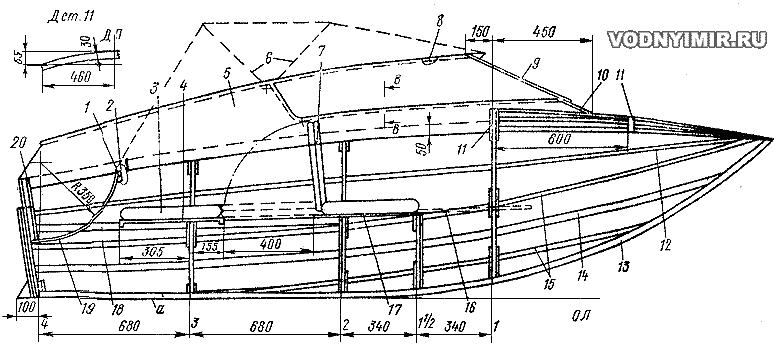
Structural drawing and cross sections on frames of the tourist version of «Rainbow-34»
  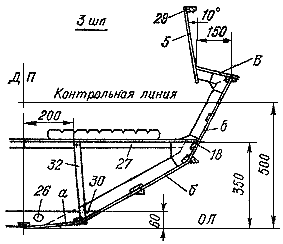   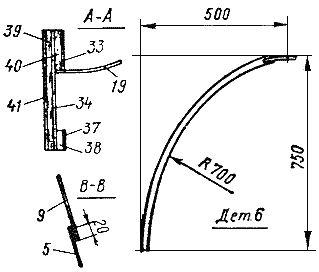 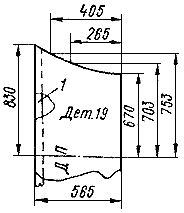    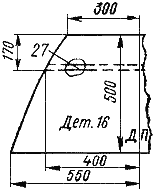 |
1 — rail, 30x40 2 — cushion for the back of the aft seat, 20x100x450 3 — pillows for bow and stern sofas, 40x450x450 (foam rubber, textovinit) 4 — aft seat, b=4 mm 5 — cockpit coaming, b=6 mm 6 — arc for awning, pipe O15-20mm, AMg (2 pcs.) 7 — cushion for the back of the nose seat, 20x420x450 8 — deck, plywood, b=4 9 — organic glass, b=4 mm 10 — cockpit frontal sheet, b=4 mm (2x2 mm) 11 — beams, b=15 mm 12 — deck and side stiffeners, 10x20 13 — keel, 20x40 14 — bottom stiffener, 10x30 15 — stringer, 15x25 16 — removable shield, b=4mm 17 — nose seat, b=4 mm 18 — side support for seats, 10x30 19 — recession, b=2mm 20 — shorty, 75x20 21 — strip, b=4mm 22 — beams, 15x30, (1 shp.) 23 — side branch, 15x40 24 — bar, 4x40x150 (4 pcs.) 25 — bottom branch, 15x45 26 — filler, b=15mm (1 1/2; 1; 2; 3 shp.) 27 — seat support, 15x20 28 — stitching on 1 1/2 shp., b=2 mm 29 — collar, 15x15 30 — knits, b=2 mm 31 — stitching on 2 shp., b=2 mm 32 — pillars, 10x15 (3 shp.) 33 — sheet, b=4 mm 34 — transom stitching, b=4 mm 35 — side and deck branches of the transom, 20x30 36 — transom bottom branch, 20x45 37 — knits, b=4 mm 38 — filler, b=20 mm 39 — bar, 15x40x400(12 pcs.) 40 — board, 20x125 41 — sheet, b=4 mm 42 — back stitching, b=4 mm 43 — bar, 15x30 44 — rail, 15x15 45 — seat stitching, b=3 mm 46 — stitching, b=4 mm 47 — remote control 48 — locker cover, b=4 mm 49 — shorty, 15x15 50 — seat support, 29x20 51 — visor, b=4 mm. |
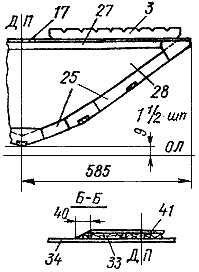
A variant of the «Rainbow-34» motorboat for anglers and lovers of short walks

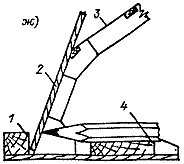
«Rainbow-34» stackless construction technology designed for anglers and lovers of short walks
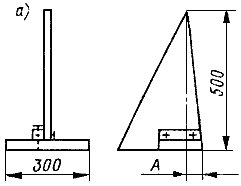
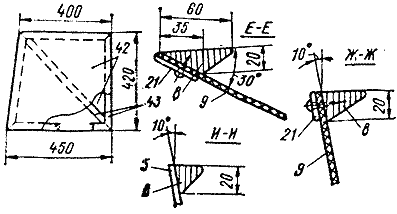
a — installation angles:
Size A:
30 — for frames
130 — for transom
g — installation of frames on the deck
1 — deck
2 — installation square
3 — frames
4 — braces
5 — transom.
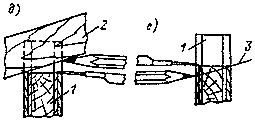
d, e — drawing a nest for a longitudinal set for a small
1 — frame
2 — longitudinal set
3 — malki line.
w — drawing of the side trim at the deck
1 — deck
2 — side skin
3 — frame
4 — lining bar.
The boat is designed for anglers and lovers of short walks. The low weight (about 40 kg) and the simplified layout of the cockpit make it possible to transport such a «Rainbow» on the trunk of a passenger car.
The cockpit seat is not fixed, it can move along the guides along the side lockers. This allows you to choose the optimal alignment of a short boat, which is very sensitive to trim.
The central passage provides the relative freedom in the cockpit necessary during fishing; on-board lockers not only serve as a capacious storage of fishing equipment, but also give the hull additional longitudinal rigidity.
The contours remained unchanged — the usual keeled shape of the seaworthy hull in combination with a flat section — ski with longitudinal redans, splash guards in the bow and the collapse of the sides along the entire length. This combination, with very small losses of lift (compared to a flat-bottomed boat), allows you to have a smooth ride on the wave without dynamic overloads. The collapse of the sides, a wide splash guard provide increased safety on circulation.
In this publication, we would like to talk in more detail about the technology of building a motor boat.
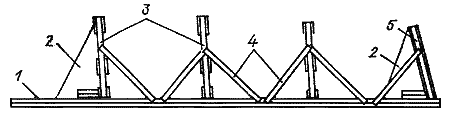
The walking version of the «Rainbow-34» is easy to build without a slipway, which significantly reduces the time and labor required for the manufacture of equipment. The assembly can be carried out on two boards with a width of about 150 mm and a length of at least the length of the motor boat or on any other flat surface.
Before assembly, it is necessary to make frames and transom, glue the billets of the deck, sheathing, walls and seams of lockers, as well as the billets of the longitudinal set and redans, if there are no whole rails. On the frames and transom, nests should be cut down for the passage of the longitudinal set. The depth of the inset should be checked with pieces of rails from which the set is made. To do this, the size of the small keel or stringers is determined by the body plaz — the test bar should protrude from the socket by this amount. Redans need to be processed according to the table of plasma ordinates of sections.
The deck billet is laid on the surface where the motor boat will be assembled; then the contour and position of the frames are marked, and lines are beaten along the width of the rest bar framing the cockpit rail and the width of the beams. The surfaces of the longitudinal deck set adjacent to the deck and the corresponding deck surfaces are smeared with glue and the set is installed in place with pressing nails in steps of 50-70 mm. Further, frame frames and a transom are installed on the deck section. The deck of the motor boat has a slope towards the norm, so the frames should not be installed perpendicular, but at an angle of 3.5° with an inclination to the stern, which will be 34 mm in height of the second frame. The transom has an inclination of the bottom part to the nose of about 15° or 130 mm along the keel, so it is necessary to make installation angles in advance. The beams of the frames and transom should be cut into the same angles. This work can be simplified if the frames are installed perpendicular to the deck, and the transom with a slope of 100 mm in the nose. At the same time, there will be no significant change in the contours.
The installed frames and transom are fixed in the desired position by braces on both sides. Then a keel is installed on the frames, which is temporarily fixed with nails of 1.5-2 mm to determine the size of the smallness of the inner surface of the nest. This value is determined as follows: the keel curved along the frames will rest on the nose edge of the nest, and a gap is formed between the aft edge and the supporting surface of the keel, the value of which corresponds to the required small. With a compass or some other layering, this value is transferred to the bow surface of the frame — the line is drawn from the edge of the socket. When the required malka is determined on all frames, the keel is removed and the nests are malked. After the final installation of the keel in place, the number of nests for stringers is similarly determined. The longitudinal set is attached to the frames with screws of 3 mm.
After installing the longitudinal set, the braces are removed, loosening the frames, and the keel, stringers and transverse set are forged with a constant check of correctness with a flexible long rail.
When the casting of the set is made, the sheathing blanks are alternately laid on the body and loosened with thin nails, the set of the body is outlined from the inside according to the workpiece, the leaf allowance is cut off according to the marking. In the locations of stringers and frames, holes are drilled 1-1.5 mm in increments of 50-70 mm. The top sheet of the side is first drawn along the deck, cut off along this edge and only after that it is finally marked up. The sheathing is installed on glue with pressing nails to the longitudinal set and screws 3 mm to the transverse. Then the edges of the installed cladding are smalked, the body is glued with a single layer of fiberglass ASTT(b)-C2O. Next, redans on glue with nail pressing are installed on the hull of the boat and glued with strips of fiberglass.
This is the end of the hull plating. Now the motorboat turns keel down. The pre-assembled recess sheet is installed in place: the beams are glued to the deck with nails pressed in, the sheet is bent and temporarily fixed to the transom at the level of the R-3 redan. The walls of the lockers are installed in place and temporarily fixed, as well as the supports of the movable seat, stitches and covers assembled in advance with rails, stitches are applied and hung on the hinges of the lid. The rail framing the cockpit is smeared in the area of the visor installation, is smeared with glue, the visor is pulled up to it with nails. After that, a collar with 3x22 mm screws is mounted on the glue along the upper edge of the visor. Both shoulder rails are applied simultaneously. All temporarily fixed joints: recess with transom and sides, walls and seams of lockers with bottom and sides, as well as the joints of the visor with the deck and the inner corners of the sides and bottom with transom are glued with a «wet square» — strips of fiberglass on epoxy glue. Crackers are glued in the places of installation of handles, glasses of rowlocks, remote control.
The last operation on the equipment of the «Rainbow» hull is the device of payoles. They can be made either of foam blocks laid between frames not the height of the flor and pasted on top with fiberglass, or from plywood sheets.
Boat projects for self-construction
Share this page in the social. networks or bookmark: