Double fishing boat «Crab» — project and drawings
The «Jack-Shprot» ace was taken as the basis for the project of the described boat (see here), however, since there was no cutting of details, no ordinate table, or many details of the device in the brief note dedicated to the ace, I had to think out a lot myself. It took a lot of time to develop drawings and search for the right material, and I made the boat itself in one month. When the «Crab» was ready and tested on the water, my comrades liked it so much that they made themselves the same boats. As a result, a whole flotilla of five identical boats sailed through the Voronezh Reservoir in 1977.
| Basic data of the boat «Crab» | |
|---|---|
| Longest length, m | 2,30 |
| Maximum width, m | 1,34 |
| Side height amidships, m | 0,40 |
| Sail area, m² | 3,5 |
| Weight, kg | 20 |
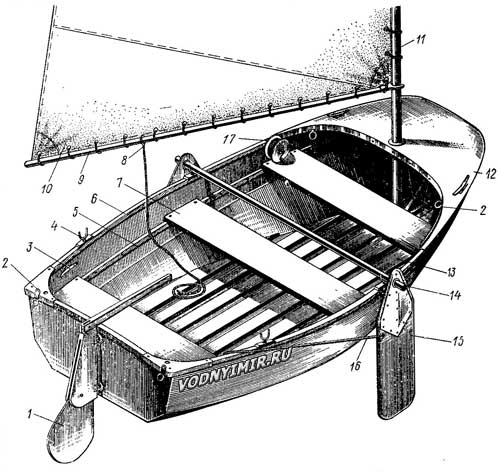 The general structure of the boat: 1 — steering device; 2 — butt; 3 — duck, 4 pieces; 4 — rowlock; 5 — podlegars, 16x35x2200; 6 — privalny beam, 16x35x2500; outside and inside the body to put the collar 10x20; 7 — bank, 20x200x1250; 8 — boom-sheet; 9 — boom, Ø=25, L=2060; 10 — sail with an area of 3.5 m; 11 — mast, Ø=40, L=2700; 12 — bow formwork; 13 — bottom slats, 8x65; length 1100-2100; 14 — shvertsbalka made of duralumin pipe 22x2; 15 — shwerts; duralumin δ=4 mm or plywood δ=8 mm; 16 — sorlin; 17 — a reel for an anchor line. zoom in, 1326x1252, 400 KB |
The boat, despite the minimum dimensions and weight up to 20 kg, turned out to be quite seaworthy, rises well on a wave, easily goes on oars, and when a fair wind blows — under sail.
The construction work begins with the preparation of the sheathing parts, cut out of plywood according to the drawings given, and the set rails.
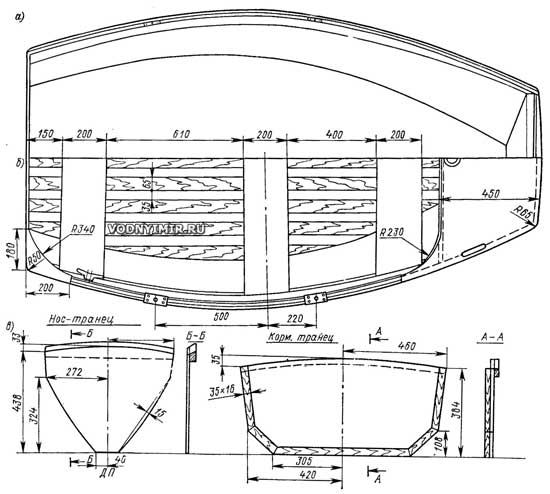 Bottom view (a), top view (b) and transom billets (c). zoom in, 1729x1552, 224 KB |
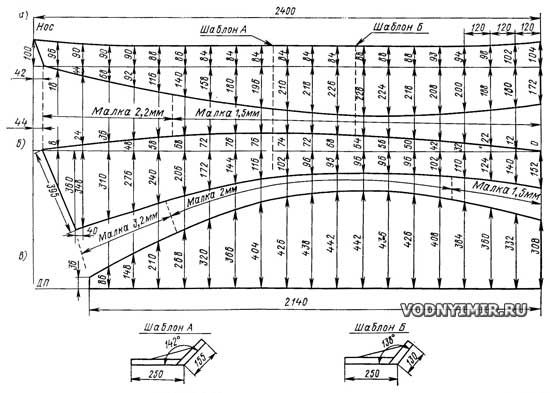 Blank sheets of exterior cladding: a — side; b — zygomatic belt; c — bottom (one detail, symmetrical with respect to DP). Thickness 5-6 mm. zoom in, 1825x1304, 235 KB |
To save material, I recommend drawing all sheet details on a reduced scale on cardboard and cutting them out. Then it is necessary to draw the available plywood sheet formats on a sheet of paper on the same scale, and lay the templates of the cut-out parts on these formats so that the waste is minimal.
The contours of the parts in full size when marking on plywood are obtained by connecting the points found when postponing the specified dimensions from the center lines, using a pattern or a well-bent long ruler. Details should be cut out (with a hacksaw with a small tooth) with an allowance of 1-2 mm. To join the sheets, you need to add 70 mm; then these edges are touched to connect «on the mustache». Before gluing, the axial lines of the connected parts are combined using a thread stretched between two nails driven into the board on which the parts will be glued. After curing the glue, the same parts of the sides are knocked together with small nails and at the same time attached with a plane along the line — processed into a clean size. After that, the necessary dimensions are marked with a reissue to remove the malka from the longitudinal edges. On the bow and stern transoms, the malka is removed in place.
Holes with a diameter of 2 mm with a step of 50 mm are drilled along both edges of the zygomatic teeth at a distance of 12 mm from the edge for subsequent connection with wire clips.
Assembly begins from the bow, passing pieces of copper wire through holes drilled in place along the edges of the bottom and sides. The ends of the wire are twisted from the outside with two or three turns with slack.
When the sides are fastened, templates A and B are placed and temporarily attached in the places shown on the scan of the skin sheets. To install the templates, the sides are forcefully opened, the templates are pressed with clamps in the right place, and then fixed with screws through the washers, after which the clamps can be removed. These templates, which define the desired shape of the body, facilitate the assembly of the cheekbone with the bottom. Having assembled the bottom, fix a temporary spacer between the sides in place of the middle jar (at a distance of 1060 mm from the aft edge of the bottom) and put transoms. The transoms are attached to the skin with 3x18 screws with a step of 50 mm and on glue.
It may turn out that the ends of the sides will protrude aft beyond the transom. Naturally, in this case, the edges should be trimmed with a plane.
Now you can finally tighten all the paper clips with pliers and compress them from the inside. All grooves and joints are glued from the inside with fiberglass tapes in three layers: the first layer is 25 mm wide, the second and third are 80 mm each, but with a shift in different directions of 10-15 mm. After the fiberglass has cured, the ends of the wire clips protruding from the housing are bitten off and the connection is glued with fiberglass tapes from the outside.
The resulting shell is reinforced from the inside with break bars on glue and 3x25 screws with a step of 200 mm, then a collar is placed that closes the screw heads. Now you can remove all four templates. The sublegars are attached 130 mm below the edge of the side with 3x18 screws in 200 mm increments; cans are placed on them, after which the spacer can be removed.
Slats are attached to the bottom, increasing its rigidity and protecting it from abrasion. This is how it is done. Holes for screws are drilled in the prepared slats in increments of 200-250 mm. Then, having laid out all the slats in their places, they are fastened with 3x18 screws, on washers, to the bottom and circled with a pencil. Then, having unscrewed the screws, the slats are removed, they are smeared with glue and put back in their places. When the glue hardens, the screws are turned out, and instead of them, pointed wooden studs are hammered into the holes (on the glue), with a sharp knife, the protruding ends of the studs are cut off from the outside and from the inside and these places are cleaned with sandpaper. The sub-deck beams becomes flush with the internal privalny beams together with breadcrumbs on glue and is fastened with 3x25 screws.
The holes in the skin remaining after removing the auxiliary devices are putty with sawdust (or wood flour), sifted on a fine sieve and mixed with epoxy glue.
From above and from below, it is necessary to put metal strip overlays on the privalny beam. Oak pillows are glued to the poduklyuchen. When there is one person in the boat, the oars are placed in the stern paddles, when two are in the bow ones.
It is better to cover the boat from the outside with thin fiberglass or a simple cotton cloth. If you take a colored fabric, then you will not have to paint the boat. The inside of the case is twice covered with hot drying oil. The bottom and cans can be painted with oil paint. The collars, knits and deck are cleaned with a fine skin, covered with drying oil, and then with a light varnish.
The longitudinal set — the halting bars and sublegars are best glued in place from two or three slats. Solid slats can be pre-bent in the steamed state. To do this, the rail is wrapped 2-3 times with a wet rag along the entire length and ironed with a very hot iron from all sides, all the while additionally moistening the rag by spraying. When the rail is sufficiently steamed, without removing the rag, it is gradually bent and fixed with a cord or wire with a deflection slightly larger than necessary; in such a tight position, it should be left for 2-3 days to dry at room temperature without a rag.
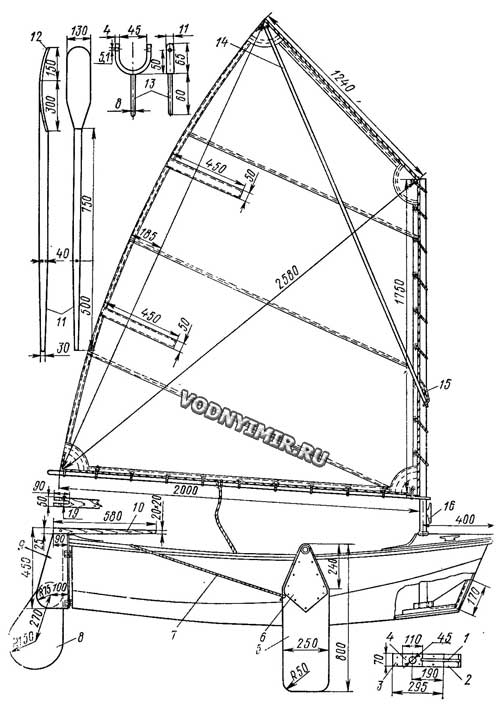 Boat equipment details: 1 — knits, plywood δ=6 mm; 2 — 20x70 nose transom trim; 3 — 20x70x295 step pad; 4 — 25x70x110 step, oak; 5 — schwartz; 6 — pad, duralumin; 7 — sorlin; 8 — feather steering wheel; 9 — baller, plywood δ=6 mm; 10 — tiller; 11 — paddle spindle; 12 — blade, plywood δ=6 mm; 13 — rowlock, stainless steel. steel; 14 — sprints, Ø 20, L=2286; 15 — sprintov's stert; 16 — duck. zoom in, 1293x1833, 216 KB |
The sailing armament is made similar to that used on the children's the «Optimist» class shverbot. The mast has a low strength, so that in a sudden squall it breaks, but the boat does not turn over (once it happened to me, I had to get to the oars).
The mast, boom and sprints are made of dry straight pine without knots and cracks. If the sail is made of cotton fabric, it must be soaked twice in hot water to shrink it; otherwise, after the first rain, the sail will be hopelessly deformed. The same applies to threads. The sail can be sewn with a pocket for putting on the mast, leaving a small gap in it for sprinting. And the lower cabinet can be left free, with the exception of the sheet corner, which is attached to the boom's noke.
The axle with the shverts is placed on the front poduklyuchin. The steering pen and the baller are cut out of a 6 mm backfanner. When I row, I hang the rudder with the tiller, thrown over the transom, out. The position of the tiller when setting zero in the DP is fixed with a cable, the ends of which are laid behind the stern ducks. This improves the stability of the boat on the course.
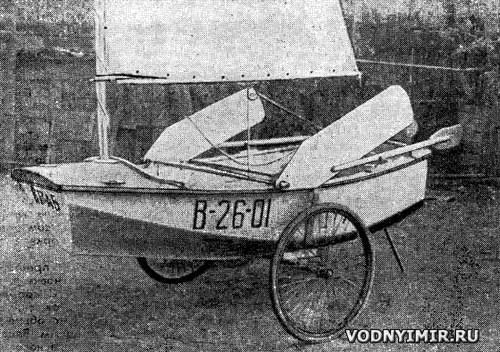 The fully equipped shverbot is ready for transportation to the reservoir. |
I deliver the boat to the reservoir and back on quick-release wheels. I haven't tried to walk under the engine just because I don't like noise.
Boat projects for self-construction
Share this page in the social. networks or bookmark:
