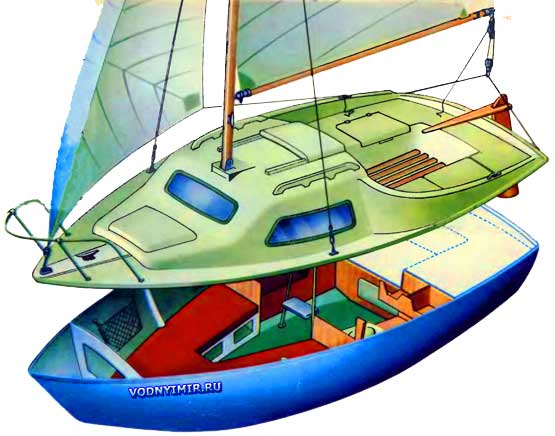
Plastic mini-yacht «Kalan». Yacht with your own hands
| Basic data of the yacht «Kalan»: | |
|---|---|
| Longest length, m | 4,3 |
| KVL length, m | 3,9 |
| Maximum width, m | 1,9 |
| Freeboard height, m: | |
| in the nose | 0,65 |
| minimum | 0,49 |
| Draft by KVL, m | 0,65 |
| Displacement at draft by KVL, m³ | 0,76 |
| Empty weight, kg | 400 |
| Ballast weight, kg | 180 |
| Actual sail area, m² | 11,2 |
| Outboard motor, hp | 2-5 |
| Maximum capacity, people. | 4 |
Twenty years ago, they would hardly have taken seriously a designer who undertook to build a yacht with his own hands, only 4 meters long, but with a cabin, a galley, two sleeping places, a self-draining cockpit. Immediately, he would have been asked a lot of sarcastic questions, for example, about the ability of such a small vessel to withstand at least a fresh wind, about its stability, and finally, about the very possibility of accommodating two adults in the cabin.
Now, obviously, there will be fewer such questions. Modern materials and, first of all, fiberglass — make it possible to create seaworthy, safe and quite comfortable yachts of the smallest dimensions. Recall, for example, the passage of William Veritai in 1955 across the Atlantic Ocean on a yacht with a length of only 3.6 m. In 1968, another remarkable American yachtsman William Willis tried to cross the Atlantic on a plastic boat of even smaller length - 3.36 m.; and although the veteran of ocean voyages was not destined to complete his plan, his "Baby" was found (just 360 miles from the final destination of the journey) afloat and in such a condition that, having pumped out the water from it, the traveler could continue his journey.
Of course, the boats of Veritai and Willis were specially designed for heavy transoceanic crossings alone: they were equipped with a massive false keel, the sail area was reduced to the size of a «handkerchief» (on Veritai's yacht, for example, there were only 10 m of sails with a 260-kilogram false keel), the hulls were hollowed out. But there are many examples of serial construction of sufficiently seaworthy mini-yachts 4-5 m long, widely used for family trips in the coastal waters of France, England and Japan. Dozens of such yachts can be seen on trailers behind cars, getting out on pre-departure evenings — from Paris or, say, Lyon to the port cities of the Bay of Biscay, the Mediterranean Sea, the English Channel. Transportability and low cost make mini-yachts very popular among Western yachtsmen with average incomes.
In our opinion, it would be possible to establish the production of such vessels at any of the factories that now produce motor boats made of fiberglass. It seems that the construction of mini-yachts would also be more cost-effective and that's why. The hull of a gliding motor boat must withstand fairly strong impacts, which are inevitable when running at a speed of 35-40 km/h (after all, the impact force is directly proportional to the square of the speed!). That is why the fiberglass construction turns out to be quite powerful — heavy, with a large consumption of expensive fiberglass and resin. As a rule, plastic boats are (with equal dimensions) 15-20% heavier and 20-30% more expensive than boats made of aluminum alloys; accordingly, the speed is lower (with equal load), more fuel consumption per kilometer traveled. So plastic boats hardly compete with metal ones, and it is not by chance that the designers of plastic vessels are strenuously advocating the speedy development of more powerful 40- and 60-horsepower engines than those produced today.
The design of the hull of a yacht floating in displacement mode, thanks to the peculiar rounded contours, giving the effect of an «eggshell», and less shock loads, can be made relatively lighter — with less material consumption and, consequently, less expensive. It should also be taken into account that the production capacities of our plastic shipbuilding so far allow us to produce vessels only in relatively small series, the size of which, obviously, at first can be considered appropriate to the existing demand for mini-yachts.
The proposed here project of a plastic mini-yacht is designed for independent construction by amateurs. That is why it may seem unnecessarily complicated and time-consuming to factory designers. However, simplification of the design usually becomes possible mainly due to the use of more complex equipment and special equipment, which it does not make sense for an amateur (or even a group of amateurs building several identical yachts) to make and purchase.
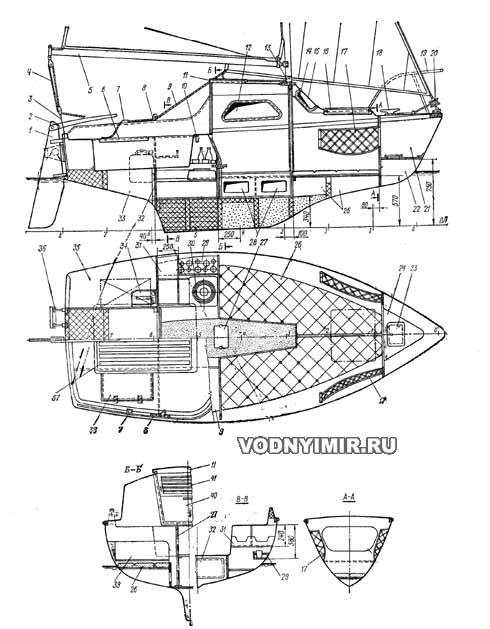
General location of the yacht
zoom in
1 — rudder feather δ=20, glued together from plywood or slats; 2 — tiller, oak or ash; 3 — rope shoulder strap boom-sheet, D=4-5; 4 — boom-sheet, nylon cable D=8-10; 5 — boom, D=60, L=2650; 6 — engine locker cover; 7 — staysail-sheet stopper; 8 — staysail-sheet block rail 2x18, L=400; 9 — staysail-sheet, nylon cable D=10 or cotton D=12-22; 10 — hanger for waterproof clothing; 11 — sliding hatch; 12 — side glass, 5x175x630, plexiglass; 13 — mast steps; 14 — rubber «window» profile; 15 — curved windshield, 5x220x950; 16 — nozzle cover; 17 — a net for shore clothing; 18 — a mooring duck L=200, oak; 19 — a bow rail, bent from an aluminum pipe 22x2; 20 — a device for twisting a staysail; 21 — a forepeak; 22 — a compartment for an anchor chain; 23 — a lid of a chain box; 24 — a shelf; 25 — compartments for provisions in waterproof packaging (or foam); 25 — mattress; 27 — removable ladder; 28 — lockers under the bunks (for storing shoes, etc.); 29 — shelf with sockets for glasses and bottles; 30 — tile; 31 — shelf for dishes; 32 — waterproof lid in compartment 33; 33 — 110 dm³ air compartment; 34 — canister-gas tank for outboard motor; 35 — locker for outboard motor; 36 — outboard motor bracket; 37 — wooden tread bars glued to the bottom of the cockpit; 6x60, oak or ash; 33 — cover in the sail locker; 39 — back of the bunk, folding, mounted on a piano loop; 40 — solid flap; 41 — blind flap.
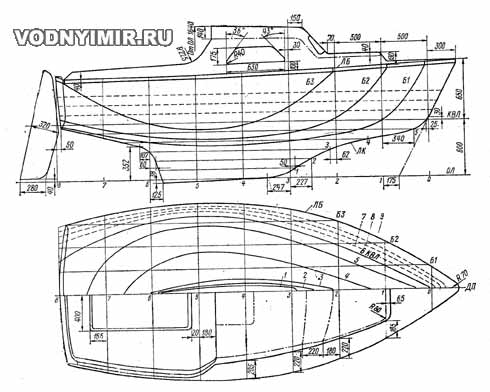
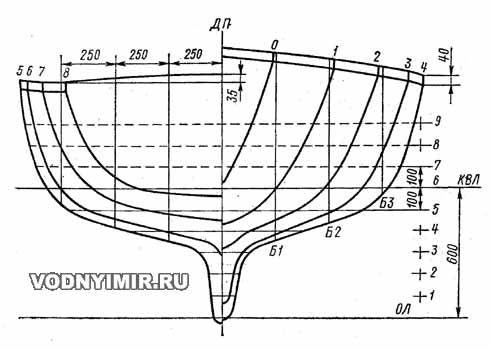
Theoretical drawing of a plastic mini yacht

Why is fiberglass chosen for the «Kalan» case? First of all, because only this material allows, with minimal dimensions of a sailing vessel, to provide acceptable conditions of habitability and sufficiently high seaworthiness. Thin monolithic cladding does not require a large number of frames, which on a wooden ship take up a significant useful volume inside the cabin. When forming a plastic housing, it is easy to obtain smooth, well-streamlined contours with a relatively low length-to-width ratio caused by the need to provide the required stability. Finally, the wheelhouse, deck and cockpit molded into one piece give a guarantee of water resistance and turn the boat into a lightweight float.
Let's briefly focus on the main technical solutions adopted in the Kalana project. The type of yacht with a permanent keel formed together with the hull is selected. The draft of the yacht is only 0.65 m, so the Kalan can be unconditionally attributed to those yachts «whose captains can go ahead of their ships». Compared to the compromise having a descending shaft, the draft is not much more (by about 0.25-0.3 m); but the boat is easier to build, the cabin is not cluttered by the mooring well, you can lower the floor in the cabin below and, most importantly, place ballast directly in the keel, which provides (along with the large width of the hull) the stability of the yacht. To reduce the wetted surface and facilitate the molding of the hull, the aft edge of the keel, unlike most foreign mini-yachts, does not coincide with the transom, but is located a meter away from it. The steering wheel hung on the transom, which is given the correct aerodynamic cross-section profile, will be quite effective and at the same time can easily be removed, for example, in the case of a stranding or an anchor rope of another vessel.
Although the «Kalan» is in no way designed to go out into the open ocean, it is equipped with a self-draining cockpit, which significantly increases the safety of navigation. The cockpit is a bathtub isolated from the interior, the edges of which are raised almost to the deck. It should be noted along the way that sometimes the result of using a self-draining cockpit on the smallest yachts turns out to be the opposite of what is desired.The fact is that by lifting the bottom of the cockpit, you cannot raise the level of the seats in it. After all, a crew of three or four people weighs almost as much as the yacht itself; when all the people are sitting in the cockpit, the center of gravity of the yacht increases significantly, and stability deteriorates — the yacht can lay sails on the water even with a small gust of wind. Similar cases were noted, for example, with the English 4-meter yacht of the Voyager type, on which the designer, in an effort to increase the volume of the «coffins», raised the seats above the deck level. On the «Kalan», the cockpit seats are specially lowered below the deck level, as far as it turned out to be possible. (In addition, instead of the zygomatic keels available on the «Voyager», a more reliable option was used — a relatively deep-submerged ballast keel.)
Roomy lockers are equipped under the cockpit seats: on the starboard side — for storing sails in the parking lot, on the left — for an outboard motor and a gas tank. This part of the case should be insulated with a waterproof bulkhead, and the locker covers should be equipped with reliable tension locks of the «phonograph» type. It is important that in case of excessive roll, the leeward cover could not open arbitrarily, and if it does happen, so that the water trapped in the lockers does not enter the hold of the yacht.
A small hatch is provided on the deck in the bow of the «Kalan». This, of course, is another «dangerous place» through which water can get inside the yacht and which needs to be monitored. However, if the ship is operated by an inexperienced crew and especially if there are children in its composition, it is simply necessary to make such a hatch. After all, he, for example, will eliminate the need to send a person to the deck to clean the sails in a squall or when shooting from an anchor; kneeling on the bunk and leaning out of the hatch, a 12-year-old child will cope with the sails without any risk of being overboard.
The probability that the yacht will be flooded with water or there will be a hole in its hull is small, but it is necessary to provide for this dangerous possibility — to provide the hull with a reserve of emergency buoyancy that would keep it afloat together with the unsuccessful crew. For «Kalan», this margin should be equal to 0.24 cubic meters. Part of it is realized in the form of a sealed air box under the cockpit. The volume of this compartment is 0.11 m³; it can be used to place food supplies or equipment that needs to be taken out relatively rarely, but the lid must be sealed securely, otherwise the compartment will cease to fulfill its role.
The remaining 0.13 m of the buoyancy reserve are foam blocks that are glued in the stern, serve as fillers for part of the keel, cockpit coamings, act as floats, etc. It is desirable that part of the foam be fixed in the bow and as close to the deck as possible — then in case of flooding the boat will maintain a stable position afloat.
In the cabin of the yacht there is a double sofa, on which, of course — without special amenities, three people can sit. If necessary, the middle opening between the sofas is blocked by a shield and then all three will be able to settle down for the night, just as it is done in a tent. Coastal clothing is provided to be stored in plastic bags, which are laid in nets attached to the sides, waterproof clothing is hung on hooks located in front of the cockpit. It is better to make a galley on the left side with a tile that moves aft: in this case, a small cutting table is also obtained.
The mast is installed in the steps on the roof of the cabin. The vertical pressure from it is transmitted to the hull through an arched beam connected to the side branches of the frame, as well as a fairly rigid frontal wall of the cabin. You can, of course, put a vertical pillar made of aluminum pipe with a diameter of 28-30 mm, but it will clutter the cabin.
Sailing armament and mast section of the plastic mini-yacht «Kalan»
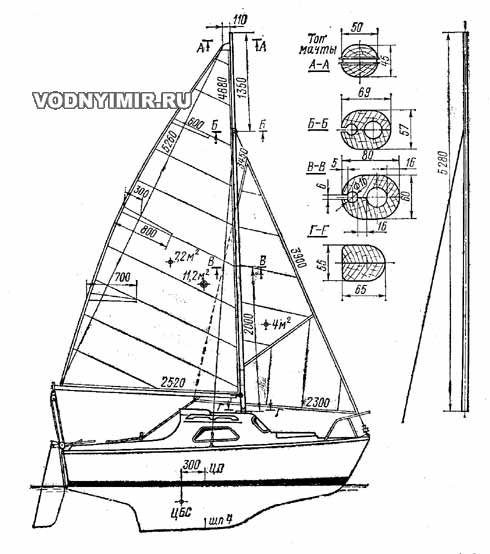
Fiberglass has not yet become particularly widespread in amateur shipbuilding. It affects not only the scarcity of raw materials — fiberglass and synthetic resins, but also such specific complexity as the need to manufacture punch molds or matrices for gluing (molding) sections of the hull and deck. Finally, in order to work on the molding of the plastic housing, you need to find a dry, heated and ventilated room with a temperature of 18-22° (only in dry and warm weather in summer you can work outdoors).
The design of the dummy punch pattern
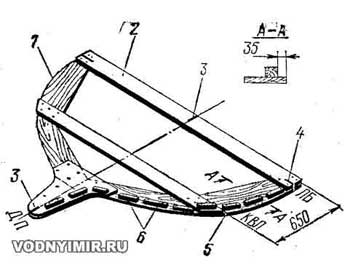
1 — a pattern board; 2 — a board with a verified edge for installation on the slipway; 3 — control risks of DP; 4 — the risk of the side line; 5 — the risk of KVL; 6 — 25x25 bars for fixing the sewing boards
Punch design
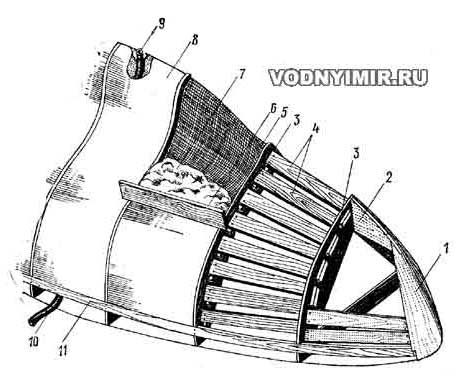
1 — stem, recruited from the bars; 2 — keel profile pattern; 3 — theoretical frame pattern; 4 — sewing boards, thickness 15-25 mm; 5 — metal mesh with a 4-8 mm cell; 6 — a bar for smoothing gypsum along the outline of the hull; 7 — raw gypsum; 8 — treated surface of the punch; 9 — hot water supply fitting; 10 — hose D=25-32mm; 11 — 15x60 rail along the side line
Design variant of the dummy punch
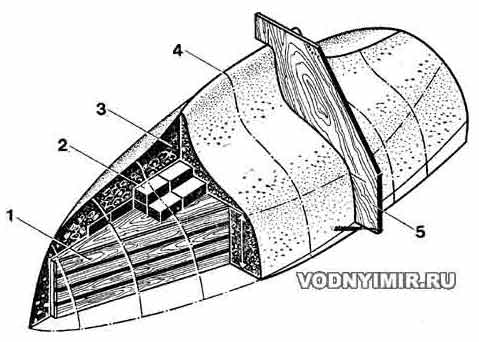
1 — a foundation made of boards; 2 — brickwork; 3 — a layer of clay; 4 — marking lines; 5 — a template for controlling contours
It is best if several builders of «Kalans» unite: it is easier to make a contented labor-intensive equipment with their own hands by joint efforts. You need to start with the purchase of the necessary materials. In case of difficulties, you can compromise, for example, replace the resin with cement or mold only the hull from fiberglass, and make the deck and cabin out of plywood. It is best to use satin weave fiberglass of the ASTT(b)-C2 type (it is produced according to MRTU6-11-140-70 or with the index O, with special processing for shipbuilding, according to TU 6-11-177-70). With its own thickness of 0.38 mm, one layer of such fabric in the skin gives a thickness of 0.5 mm, so that 9 layers will need to be laid on the main hull of the yacht, and 8 layers of fiberglass on the deck. In total, about 300 square meters of ASTT fabric will be used for molding the Kalan body, which is produced in rolls 0.9 m wide (see the table of material consumption). The lining, made entirely of this fabric, will have both high strength and absolute water resistance. The only drawback of this option is the need to lay a relatively large number of layers. You can save time and, as can be seen from the table, money if you use a thicker fiberglass bundle weave — steklorogozhu TZHS-07 (MRTU 6-05-899-63) 0.7 mm thick or even thicker. However, it should be borne in mind that due to the greater thickness of the material, it will be necessary to increase the radii of the interfaces of various surfaces on the tooling. In addition, dense bundles of fibers are worse impregnated with a binder, and with insufficiently thorough impregnation and weak rolling of the layers on the tooling, the finished skin will filter water. The latter drawback can be eliminated if both types of fabrics are used in combination: the outer layer of the ASTT skin, two layers of TZHS, a layer of ASTT, two layers of TZHS, an inner layer of ASTT. The deck can be formed from three layers of fiberglass, enclosed between the outer layers of ASTT fabric.
In Table 1, an even thinner fiberglass fabric of plain weave is also indicated for the outer layer — the SE glass mesh; due to its small thickness and good permeability to the binder, it evens the surface, hides the rough texture of the underlying fiberglass layer and holds the outer decorative layer of the painted binder well.

In all cases, fiberglass will turn out to be durable only on the condition that the weight of the binder used is approximately equal to the weight of the reinforcing glass: deviations in one direction or another are allowed by no more than 5%.
In industrial plastic shipbuilding, a binder based on unsaturated polyester resin of the NPS-609-21M brand has been primarily used. For amateurs, PN-1 and PN-3 resins are more accessible, the use of which in industry is limited due to the strong release of a toxic substance — styrene. It is necessary to mold the hull on such resins in a well-ventilated room; even after the fiberglass has completely cured, the characteristic smell of styrene will remain inside the cabin for a long time. The hull of the yacht can also be made with the use of expensive epoxy resin ED-5.
 To mold the «Kalan» body, it is necessary about 100 kg of binder; its components and their ratio in the composition of the binder are indicated in Table 2.
Work on the construction of a yacht begins with the manufacture of a dummy mold. The simplest option is the use of construction gypsum or cement. According to the preliminary breakdown on the plaza (a sheet of plywood 1.5x2 m), it is necessary to make patterns of all frames from inch boards.
The blockhead (punch) will be assembled upwards with a keel on the basic horizontal plane, so on the plaza you need to punch a straight line corresponding to the position of this plane — 650 mm higher than the KVL, and bring the ends of all patterns in height to its level. In order for the contours of the body to correspond exactly to the projected ones, when making patterns, it is necessary to take into account the thickness of the plastic lining — 5 mm; for this, from the outlines of the frame built according to the plasma data, it is necessary to put 5 mm inside the body and, drawing a line along this marking, collect the pattern along it. Do not forget to put the finished pattern on the plaza and transfer to it the risks of control lines that ensure the accuracy of the assembly (side lines, DP, KVL).
On both sides, short bars should be nailed to each pattern, to which then the clippings of the boards (sewing of the spats) will be attached, forming a rough shape of a blockhead. The patterns are installed on two strong 5-meter beams with the upper edge adjusted horizontally, making sure that the risks of DP on each pattern are located strictly in one straight line, and the planes of the patterns are strictly vertical. The patterns are linked together using any scraps of boards; old boxes can be used for this purpose. At the bottom, at the level of the side line, a rail should be embedded in the patterns and a plywood strip should be fixed to it, which will serve as a height limiter for both the gypsum layer when finishing the blockhead and for fiberglass when molding the body.
It is recommended to lay a metal mesh with a 5x5 cell on top of the sewing boards in each shpation — the gap between the patterns, which will reliably hold the gypsum layer on the block. In the bow and stern, in addition to the transverse ones, you will have to put longitudinal patterns that set the profile of the keel line, as well as assemble the shapes of the stem and transom from wood.
Skirting the flexible rail according to the patterns, cut off all the protruding corners and sharp edges — remove the malki. The space between the patterns is plastered — it is closed flush with the edges of the patterns with a solution of construction gypsum, or alabaster (gypsum 100 parts by weight, fine sand 100 v. h., water 40 v. h.). Cement can also be used, but it «gets up» longer and it needs to be wetted with water for a certain time. With the help of a thin bar (longer than the spatula), the surface of the block is leveled, all irregularities are carefully smoothed out with trowels. In this way, they ensure that the dummy accurately reproduces the specified shape of the yacht's hull. When the plaster dries (it takes about a day), the surface of the blockhead must be plastered, sanded and painted with enamel.
In parallel with the manufacture of the hull block, a block is usually made for molding the deck section. There are no fundamental differences in the design of this blockhead. Rigid transverse patterns having a height from the horizontal base plane sufficient to form the bottom of the cockpit are mounted on trestles (with checking the position relative to the DP and along the length of the yacht) and fastened. Then slats are bent around the edges of the deck according to patterns and fastened, the entire area of the deck is sewn up with scraps of boards and plywood. We emphasize that it is not necessary to reduce the half-width along the deck relative to the theoretical ones, since the deck edge bent down should overlap the edges of the sides of the main body during assembly. The cockpit is made in the form of a plywood box; the radii of rounding inside this box can be made of plasticine. The blockhead for forming the cabin is assembled on exposed transverse patterns similar to the assembly of the blockhead of the main body. Sometimes the volume between the patterns is filled with the installation of a wooden box, which is then lined with bricks and covered with cement mortar or even clay.
In all cases, it is important that all the resulting «vertical» wall surfaces have some slope to simplify the removal of the molded section from the block. If only one yacht is being built on a set of rigging, the cockpit coamings are made of foam in such a way that they enter the section structure and, after pasting with fiberglass, are removed along with the entire deck.
The operation with which the actual construction of any plastic housing begins is the cutting of fiberglass (previously it must be well dried, and this can be done in the sun). The first strip of fabric is covered with the side, lowering its lower edge to the bar that limits the side line. In the nose, the end of the panel should be wrapped around the stem, in the stern — to skip the edge by 50-100 mm to the transom. The lower edge of the next panel should overlap the edge of the previous one by 50 mm. Separate pieces of fabric are cut out on the transom. Outline the contours with a soft pencil, cut the fabric with scissors. The fitted panels are temporarily fixed on the block with adhesive tape.
It is worth taking care that there is no noticeable thickening of the skin in places where the edges of adjacent panels are cut. Of course, these thickenings will not affect the hydrodynamics of the yacht, but it is more pleasant to have a completely smooth hull. (When building several yachts, the ideal outer surface of the hulls can be obtained if the first hull removed from the dummy is used as a matrix for molding the rest.)
The prepared layers of fabric are laid on the table in reverse order and proceed to the preparation of the binder. It should be taken into account that the viability of the resin with the introduced curing components is no more than 2.5 hours, therefore it is necessary to prepare the binder in small portions that can be used during this period. To form one layer of the Kalan skin, it is enough to prepare 5 kg of binder according to the recipe specified in Table 2. 2 hours before the start of work, a thixotropic filler must be introduced into the resin — white soot of the U-333 or A grades (in the amount of 5-7% of the resin weight) or aerosil (1-1.5% of the resin weight). The filler increases the viscosity, prevents the appearance of binder stains on vertical surfaces.
Before starting work, the resin is thoroughly mixed and the required amount of initiator and accelerator is weighed. For polyester resins, the initiator is hyperiz, with which they can stand for several hours, for epoxy resins — dibutyl phthalate, with which they are stored for a long time. An accelerator, cobalt naphthenate, is first introduced into polyester resins and only after a good (for 10-15 minutes) mixing is added hyperiz; these two components should not be connected directly, since an explosion may occur.
When preparing a binder based on NPS-609-21M resin, an additional accelerator is introduced into the resin. The necessary dose of it must first be dissolved in a small amount of the prepared binder, and then, with careful mixing, an additive must be introduced into the bulk of the binder. In order to exclude the possibility of gluing fiberglass to the surface of the block, it must be covered with a separating layer before molding. It can be thin cellophane, a 10% suspension of wax in gasoline, a 10% solution of polyvinyl alcohol. The wax emulsion is applied with a swab or brush and immediately polished with a soft cloth. The separation layer should evenly cover the entire surface of the blockhead without gaps. A good substitute for wax and cellophane are ordinary newspapers glued to the dummy with rubber glue.
Strips of fiberglass are laid in turn on a block, well (but without excess) impregnating with a binder with a brush and rolling a roller to the surface. High-quality fiberglass is obtained only with good penetration of the binder into all the pores of the fabric. The first layer of fabric must be maintained for 1-1.5 hours so that the resin «grabs» and when laying and stretching the subsequent layers, it was impossible to move the lower one. After this time, the binder is applied to the first layer of fabric and the molding work continues without long breaks (breaks should not be longer than it takes to smoke a cigarette).
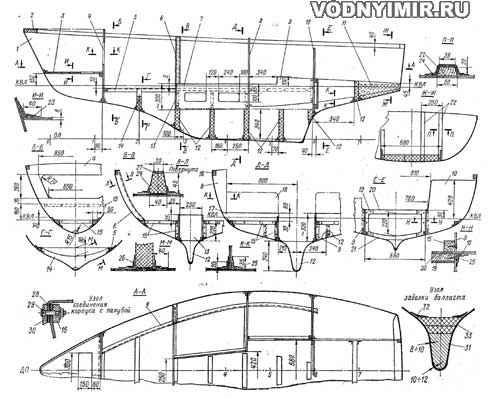
Yacht hull set
zoom in
1 — body; 2 — 30x150x200, pine; 3 — shelf, plywood, δ=6; 680x820 blank; 4 — forepeak bulkhead, plywood δ=6; 580x800; 5 — support stringer of bunks; foam, glued with two layers of fiberglass; 6 — frame; 7 — longitudinal wall of the bunk, 6x280x850, plywood; 8 — upper part of the bulkhead, plywood 6x180x500; 2 pcs.; 9 — longitudinal support of the cockpit — the base of the locker, 6x350x1750; 10 — bulkhead of the afterpick, 6x580x660, 2 pcs.; 11 — foam filler of the afterpick; 12 — foam flor, δ=40-60; 13 — transverse bed base, 6x260x1050; 14 — flor on shp. 2, foam 40x250x800; 15 — rail 25x25, pine; 16 — timber 15x40x4600, 2 pcs., pine; 17 — bulkhead berth, 6x320x680; 18 — folding part of the bulkhead (on the piano loop), 6x240x590; 19 — plywood cheek δ=4, stick on both sides of the bulkhead; 20 — rail 20x50; 21 — flor bulkheads δ=22, pine; 22 — transom racks (for mounting the outboard motor bracket), 20x50x560; 3 pcs.; 23 — molding shelves in three layers; 24 — pasting strips of fiberglass in two layers; 25 — molding of plywood parts of the set with fiberglass in two layers on both sides; strips 40 and 70 mm wide; 26 — molding of foam flores, strips with a width of 50 and 80 mm; 27 — a fiberglass belt, 2x20; 28 — a strip of glass mesh on a binder (to lay when assembling the case); 29 — a screw M5x50, brass; pitch 150 mm; 30 — a collar 18x35x4600; 2 pcs.; ash, oak; 31 — ballast; steel scrap filled with cement; 32 — foam molding, 4-5 layers of fiberglass; 33 — foam sealing of the keel cavity.
Immediately after the full thickness of the skin is typed, the allowance along the side line should be cut with a knife, because after the plastic is completely cured, it will be more difficult to do this and it will be possible only with a hacksaw. Having finished molding the skin, it is kept on a block until complete polymerization. Under normal conditions, this time for plastic based on PN-3 resin is 24 hours, and when using NPS-609-21M resin — three days.
The finished section is removed from the mold with the help of wooden wedges, which are placed around the perimeter between the skin and the blockhead and evenly padded. Sometimes hoists are used, hot water is supplied through fittings pre-installed in a block on the keel. If all these measures do not help, when removing the hull section, it is necessary to cut the skin in the bow along the DP (in the future, the incision is molded from the inside and outside with fiberglass strips). After removing the hull, it is untangled, put down the keel into the pre-prepared keel blocks, unfasten the sides with spacers and proceed to install the kit. But first you need to bring the thickness of the skin in the middle part of the keel cavity to 8-10 mm, additionally laying the right number of layers of fiberglass from inside the case. It is useful to make sure in advance that the sections of the hull and deck can be connected by combining them; then the deck is removed and the places of installation of the kit on the skin are marked (the position of the frames, DP, KVL, etc. is taken out).
The peculiarity of the Kalan hull design is that the strength and rigidity of the shell are attached to the elements that are also parts of the internal equipment - bulkheads, walls of lockers and bunks. All these details are cut out of 6-8 mm plywood according to the plaz marking with an allowance and adjusted in place. Fillers of longitudinal stringers — supports of bunks (see the drawing of the hull design) and the frame are cut out of dense foam of the PCB type. These fillers are glued to the skin, and then molded with strips of fiberglass. The first strip — the narrowest — should go to the skin 15-20 mm on each side of the filler. The next layers are made wider and wider so that each strip overlaps the previous one by 10-15 mm on the side. (It should be borne in mind that foam plastics of the PS brands are dissolved by styrene contained in the PN-3 resin; therefore, it is possible to glue and mold such foam only with epoxy resin.) Foam floras and bulkheads are molded to the skin in a similar way. In case of loose fit of the edge of the kit to the skin, a bundle of glass threads impregnated with a binder can be laid into the gap. Along the way, we note that with a long break between the molding of the skin and the installation of the kit, it is absolutely necessary to clean the places of gluing with a skin with the mandatory removal of the hardened resin layer.
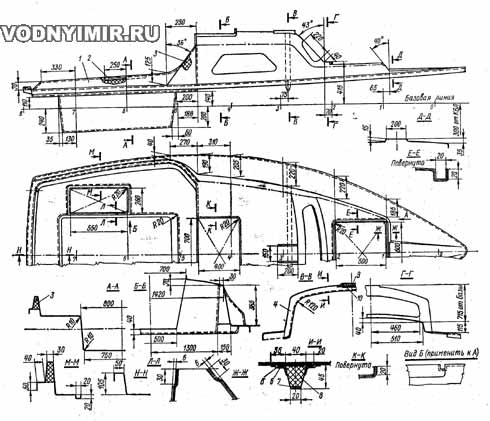
Plastic yacht deck construction
zoom in
1 — deck, δ=4; 2 — liner for the rail of the stack-sheet, pine 22x35x600; 3 — filler of coamings, foam PS-4; 4 — mast beams; 5 — gluing, two layers of fiberglass; 6 — molding, strip width of 50 mm; 7 — belt, fiberglass 2x20; 8 — PVC foam; 9 — filler for steps 20x160x200, pine; 10 — gluing children. 9, two layers.
Wooden fillers are placed on the deck section (on resin with molding) at the attachment points of ducks, blocks, mast steps, foam decorators of cockpit coamings. A mast beam is molded to the roof of the cabin from the inside; to increase its rigidity, it is necessary to lay several narrow strips of fiberglass along its free belt to a total thickness of 2 mm.
Before joining the sections, the upper edge of the side must be reinforced with a timber, which is placed on the resin, crimping the skin along it with clamps. Between the contacting surfaces of the joint, at the time of covering the hull with the deck, a strip of glass mesh is laid, abundantly impregnated with a binder. Having wrapped all the screws on the privalny beam, it is glued with two layers of fiberglass from the inside, passing the edges of both strips down to the side and up to the deck. The bulkhead under the cockpit and the longitudinal walls of the lockers are molded to the skin, achieving water resistance.
It is best to putty and paint the finished housing on the same binder that was used for molding the housing. The main recommendations on this issue are given in the books «15 projects of vessels for amateur construction» and «300 tips on boats, boats and motors». In the first book, the yacht builder will also find recommendations on the equipment and armament of the yacht (you can focus on the drawings of the Shrimp boat).
The pipes for draining water from the cockpit are removed into the transom; they can be made soft — from a durite hose with a diameter of 25-32 mm. Since the bottom of the cockpit is located near the waterline, when running on a large wave, water through these tubes can periodically enter the cockpit, so their openings in the cockpit should be provided with plugs.
We recommend ballasting the yacht with lead or steel ingots laid in the keel and filled with cement mortar. The required amount of ballast (180 kg) should be placed as deep as possible and as close as possible to the bow. Finally, the keel cavity is closed with a foam plate, which is molded around the perimeter with solid «wet squares» of fiberglass strips.
Boat projects for self-construction
Share this page in the social. networks or bookmark:

