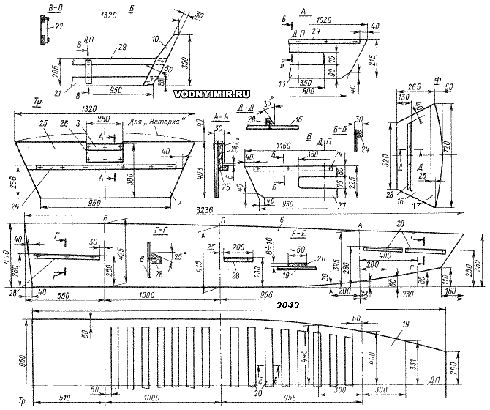
Construction of the motorboat «Johnboat»
Simple flat-bottomed and blunt-nosed boats of the «johnboat» type, which have become widespread on the rivers of North America, have been told more than once. Our industry has made attempts to release similar boats made of aluminum alloys, characterized by simplicity of design and relative cheapness, into the retail network. But, unfortunately, the appearance of «Taimen» or «Kazanka-6» is unusual for our consumer, and maybe not enough skillful and energetic advertising did not contribute to the growth of popularity of «johnboat» type boats, which are very convenient and unpretentious in operation, especially in rural areas in our conditions.
At the same time, many amateur shipbuilders showed interest in boats of this type and tried to repeat their characteristic features in their own designs of fishing and commercial vessels, boats for transportation on the upper trunk of a car. This boat can be recommended for use on small rivers and lakes, in waters protected from wind and waves. It is suitable for rowing or swimming with a low-power motor — preferably with a two-power «Salute» or with some preserved «Arrow» or «Surf». If only the «Breeze-8» is available, it is better to put a throttling washer with a hole with a diameter of 11 mm between the carburetor and the crankcase. In this case, the engine power will decrease to 5 hp, which is quite enough for planing with a load of 1-2 people, and most importantly — safely.
Motorboat «Johnboat»
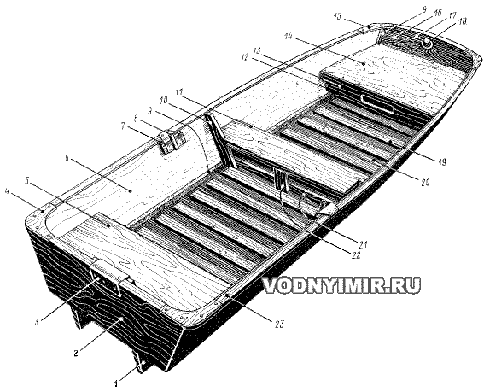
1 — keel, 20x25x2760, 2 pcs.; at the aft end, glue triangular fins; attach to the bottom with glue and screws 4x20 in 180 mm increments; 2 — transom 6x403x1320; plywood; 3 — transom shackle 1,5x120x250; aluminum alloy; 4 — tailboard 5x150x150, plywood; to fasten on glue and nails 2x16; 5 — aft seat, 5x500x1170, plywood; to fasten on glue and nails 2x16; 6 — side covering sheet 5x440x3250, 2 pcs.; 7 — pillow poduklyuchiny, 16x70x150, 2 pcs.; 8 — poduklyuchina; 9 — molding with fiberglass tape; 3-4 layers inside and 1-2 layers outside; 10 — toptimbers 20x60x450; to fasten to det. 21 on 3x50 copper rivet nails and glue; 11 — a 20x250x1150 rowing can; attach to the sides through the children. 28 with 4x40 screws; 12 — forming of half-columns; 13 — nasal half-column, 5x215x1020, plywood; 14 — nasal seat, 5x1000x620, plywood; 15 — nasal 5x150x150, plywood; 16 — bow transom (forspigel) 5x320x720; plywood; 17 — beams 20x75x720; glue to children. 16; 18 — eye for the halyard (the second one is installed in the stern); 20 — rail 10x75x870; 19 — bottom lining sheet, 5x950x2780; 21> — flor, 20x60x1000; 22 — pillars 20x50x200; 23 — gunwale — privalny beam; glue together from two rails 18x40x3400; 24 — seat support rail 20x20x1000; 25 — engine board 20x190x1320; 26 — lining 8x135x250, plywood; 27 — stern half-deck 5x225x1160, plywood; 28 — support rails 25x25; 29 — rail 20x35x1100; 30 — paper clip made of copper wire.
| Basic data of the boat «Johnboat»: | |
|---|---|
| Longest length, m | 3,20 |
| Keel length, m | 3,00 |
| Maximum width, m | 1,32 |
| Bottom width, m | 0,95 |
| Minimum side height, m | 0,38 |
| Body weight, kg | 48 |
| Maximum passenger capacity, people | 3 |
| Recommended outboard motor power, hp | 2~8 |
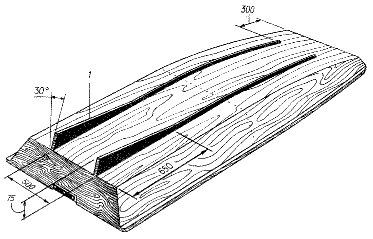
Like a real «johnboat», our boat has a flat bottom and sloping sides with a large collapse outwards. A relatively narrow bottom is an advantage when rowing or planing under an outboard motor, and the collapse of the sides prevents overturning during roll and reflects down splashes. Two keels, equipped with low fins near the transom, help to keep the boat on course when rowing, protect the bottom from friction against sand and pebbles when pulling ashore and, together with transverse bars glued to the bottom from the inside, provide the necessary strength. The wide bow tip, rising above the waterline, helps the boat to overcome a steep wave, for example, from passing boats.
Location of outer keels
The design of the housing of our «johnboat» is quite simple. It is designed for use as an outer covering of sheet material — construction plywood of the FSF or FC brand with a thickness of 5-6 mm, five-layer (aviation) plywood BS-1, BP-1 or BPS-1, hardboard, waterproof cardboard or fiberglass with a thickness of 2.5-3 mm. This makes it possible to do with a minimum number of elements of the transverse set, and the assembly of the hull is carried out without a slipway — by pre-stitching pre-cut sheets of sheathing and transoms with metal clips, followed by pasting fiberglass tapes on an epoxy binder. This method is described in more or less detail in «Boats and yachts» No. 144 for the «Grayling» boat, for the motor boat (see here) and in the 3rd edition of the book «15 projects of vessels for amateur construction». Having prepared the necessary materials according to the given specification and drawings, connect the blank sheets of the outer skin of the sides and the bottom to the desired length. Plywood is best docked «on the mustache» with a length of the burr equal to 10-12 sheet thicknesses; cardboard and hardboard can be docked on an overlay having the same width; joints of sheets of fiberglass are pasted inside in 4-5 layers with strips of fiberglass on an epoxy binder and outside with 1-2 layers of the same strips. Plywood sheets, as well as other wooden parts, are glued together with the same epoxy glue, PVA glue or other brands, the trade packaging of which contains information about their sufficient water resistance.
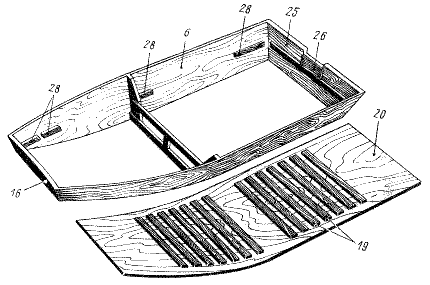
The beginning of the assembly of the «johnboat» hull
According to the dimensions indicated in the drawings, the contours of the sheathing sheets are marked and the position of the abutment lines of the edges of the frame B and the semi-columns A and B. An allowance of 2-3 mm should be left on the edges of all plywood parts for final gouging. On parts 2, 13, 16 and 27, the position of the diametrical plane (DP) is marked, which, when assembling the housing, must coincide with the DP line on the bottom sheet. It should be noted that all the marking of the position of the frames must be done on the inside of the sheathing sheets. On a sheet of thick paper or cardboard, you should draw the outline of the frame B and, attaching to this drawing the blanks of the rails 10, 21, 29 and 22, assemble this frame on nails and glue. The protruding ends of the nails must be riveted by placing washers under them, or bent. Having placed the frame B in a vertical position, sheets of the lining of both sides are sequentially applied to its outer edges in such a way that the aft edge of the toptimbers 10 coincides with the line of the frame applied on the skin. The sheets are attached to the toptimbers with glue and 4x20 screws with a countersunk head. It is enough to wrap 3 screws in each toptimber.
Connection design and sequence of their execution
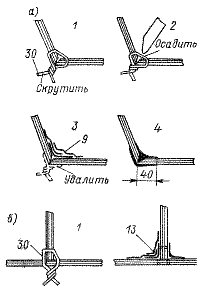
a — groove along the cheekbone (connecting the bottom to the side);
b — connection of semi-columns with skin
Then, a transom 2 with all the parts attached to it — a motor board and a rail 24, which serves as a seat support 5, is attached to the aft ends of the side sheets. In the joined edges of the sheets of the sides and transom, holes are drilled in pairs for wire clips with a diameter of 2 mm, pre-chopped copper wire blanks with a length of 60 mm are inserted into them. By twisting the ends of the wire protruding outward with pliers, the edges of the parts are pulled together to a minimum gap. Similarly, the bow transom is mounted. Having put the blank sheet of the bottom on a flat floor, stick the strips 19 on it (from the inside). With good pressing — pressing of the slats to the skin with bricks or similar heavy objects, additional fastening with nails hammered into the slats through the skin will not be required. Along the zygomatic edges, it is necessary to leave a free space 40 mm wide for gluing fiberglass tape at the junction of the bottom with the sides. When the glue hardens (usually after a day), you can attach the bottom to the sides, checking that the control risks of DP on both transoms and frame B coincide. 21 sheets of the bottom are attached to the flortimbers with glue and screws, then holes are drilled in pairs for paper clips near the edges of the sides and the bottom (at a distance of 8-10 mm from the edge). Having put 2-3 paper clips with a step of 150 mm on one side, put symmetrical paper clips on the opposite side, avoiding skewing. Staples need to be placed, starting from the frame B, in the bow and stern; then the bow and stern edges of the bottom sheet are pulled together with the corresponding transoms. Twisting the ends of the paper clips from the outside, make sure that the case does not get skewed at the same time. The next operation is the installation of semi-columns 13 and 27, for which wire clips are also used, dragged through holes in the semi-columns, sides and bottom. From the inside, all the paper clips must be compressed to the skin with a hammer or a blunted chisel; then the gaps between the edges of the sheets must be plastered with epoxy putty or binder with wood flour injected into it. You can immediately start pasting the joints from the inside with fiberglass strips. The first strip is glued to the groove in such a way that the tape is positioned symmetrically relative to it. The second layer of tape is shifted onto the side or bottom by 15-20 mm so that it overlaps one of the edges of the previous layer. The third layer is shifted to the other side to cover the second edge of the first strip. After gelatinization of the binder of the inner pasting, the ends of the paper clips protruding outward are bitten off with wire cutters, they are filed flush with the surface of the lining with a file and, if necessary, the grooves are pasted on the outside, they are pasted with tapes in 2-3 layers.
Assembly of the aft part of the «johnboat» hull
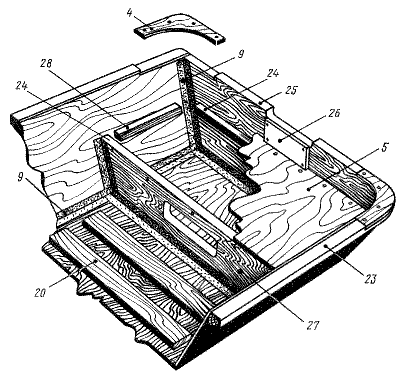
If the blanks of all three seats are already ready, and the support rails 28 are glued to the sides, then you can paint or polish the hull from the inside within the bow and stern seats and cover them with floorings 5 and 14. Previously, foam plates (with a total volume of about 40 cubic decimeters) should be glued to them from the bottom side of the decking, which should ensure emergency buoyancy of the boat in case of capsizing or flooding by a wave. Outside to the sides with the help of clamps and tsvnnok, the rails of the rest bars 23 are glued, and to the bottom — keels with fins 1, pillows of the poduklyuchina 7; then the knits 4 n 15 are cut into the transoms and the rest bars. Poduklyuchiny, rowlocks, and oars can be made according to the drawings given in «Boats and yachts» 144 for the «Grayling» boat. Do not forget to install 18 rims for the halyards, as well as equip the boat with a scoop for removing water, an anchor with a nylon cord, and life-saving accessories. The water resistance and rigidity of hardboard and cardboard can be improved if they are soaked on both sides with a liquefied epoxy binder, and then painted. It is enough to polish, putty and paint the plywood case by applying a primer layer of paint and two decorative layers of paint. It is necessary to use waterproof paints recommended for outdoor work — oil, tape-phthalic PF or glyptal GF. It is recommended to paint in two colors — one on the outside and the second, lighter one on the inside. If the weight of the case is not critical, then it can be pasted on the outside with 1-2 layers of thin fiberglass.
The boat can be built with a covering of boards with a thickness of 14-16 mm on the bottom and 10-12 mm on the sides. At the same time, it will be necessary to make transverse patterns according to the shp. A and B and transoms and cut into them along the cheekbone stringers with a cross section of 20x40 mm. The bottom can be sheathed with transverse boards, and the sides — longitudinal on grooved rails. The weight of such a boat will, of course, be greater than with plywood or hardboard cladding.
Boat projects for self-construction
Share this page in the social. networks or bookmark:

