Construction of a plastic sectional kayak
I have long wanted to build a tourist kayak that, while remaining collapsible, would be more durable, stronger and lighter than commercially available «Salute». I went through a lot of options before coming to the conclusion, that the best is a sectional fiberglass kayak.
The 5.6 m long triple kayak, which I built in the summer of 1971, consists of five sections with sealed bulkheads at the ends. The end sections are adapted for luggage storage and are closed from above: the bow section has a removable lid with a hatch, and the stern section has a permanent lid with a hatch. Each of the three middle sections also has a removable cover with a bulwark, on which an apron is stretched if necessary. All removable covers are fixed with locks.
If the three middle sections are replaced by one having a length of 1080 mm, a three-person kayak turns into a single one.
Disassembly and assembly sectional kayak takes no more than 10 minutes. The weight of a three-person boat (without oars) is 33 kg, i.e. significantly less than the «Salyut-5,4». The strength of the kayak assembly was checked by placing it on two supports with the stern and nose, and a person was sitting in the middle section. No residual deformations were found, although there is no set in the design, and the deck sections are simply put on the upper edges of the hull sections.
All sections are stacked sequentially one into another (D in A, then in D, B, C), the dimensions of the packed kayak become equal to the dimensions of the largest middle section, which allows it to be transported even in a bus.
Split into sections. Naturally, the overall dimensions and contours of the boat are chosen taking into account the navigation area, the build of the crew members and other circumstances. It is only important to remember that the sections should be embedded one into another, and any reduction in width along the waterlines and an increase in keel, compared with those adopted on «classic», proven kayaks, negatively affect stability and load capacity.
The length of the embedded section must be less than the section in which it is embedded. My kayak is divided into sections by length as follows: 950-1050-1100-1200-1300; thus, in only one case — when inserting section A into section D, the difference is less than 100 mm. The maximum width of the inserted section should be at least 10 mm less than the width of the section into which it is inserted, at a place located 100 mm from the joint (since the smaller section can be shifted along the length inside the larger one). The slope of the side and the radius of the cheekbone, as well as the rise of the keel line on the extreme frames and the radii of the rods are made the same or also selected taking into account the possible more compact laying of sections. In addition, it is necessary that the protruding bulwarks of the cockpits allow the covers to enter one another.
Partitioning scheme and theoretical drawing of the kayak
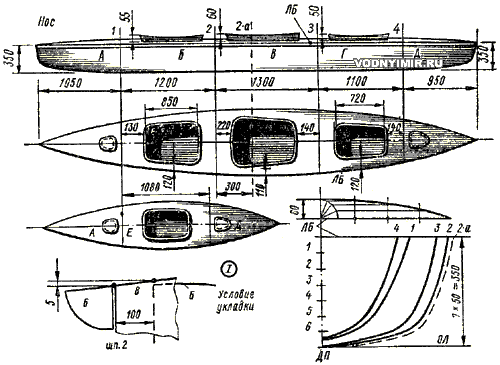
E is an additional compartment for assembling a single kayak.
Plaza table
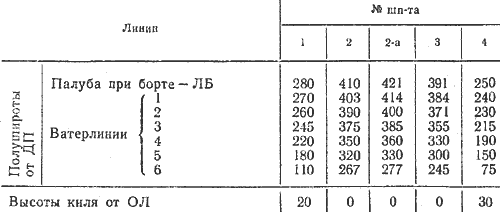
The sketch and the table for example show the dimensions of the section of my three-person kayak that meet the conditions considered. Its contours, in principle, differ little from the contours of the «Salute».
Production of molding models. The most time-consuming work is the production of models (dummies or punches), according to which sections of the housing are glued. I made the dummies with reinforced cement on a wooden frame made of two end walls sawn along the plaza (δ=6 mm) and 10x30 longitudinal rails, reinforced with struts. On top of the slats, I fastened with nails, a layer of roofing and a layer of reinforcement — a metal mesh with a 5x5 cell. The outlines of the deck in the plan were set by longitudinal patterns cut from the board, on which the frame was placed.
The device of an armo-cement model (dummy) of a plastic kayak for forming a section In
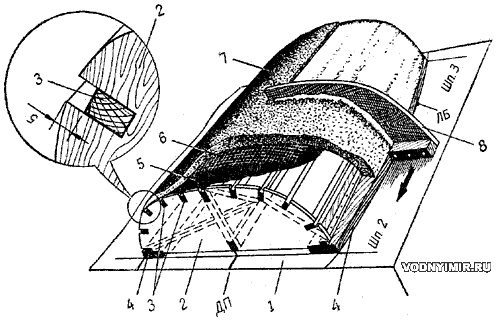
1 — the surface of the table with the marking of the DP, the places of the frames and the deck line for the frame assembly; 2 — plywood frame pattern, sawn along the plaza (shp. 2) from plywood; 3 — longitudinal slats (stringer) of the frame; 4 — deck line patterns at the side; 5 — roofing (thick paper); 6 — metal mesh; 7 — a layer of solution; 8 — a pattern that removes excess solution.
After fixing the frame and straightening (leveling) the mesh with a hammer, a layer of cement was applied to it. To simplify matters, I advise you to make plywood templates that define the correct outlines of the cross sections of the hull — from the deck line at the side to the horizontal middle part of the bottom. After pre-leveling the mortar layer, place the template on the plane of the forehead close to the deck line; now, moving it (without skewing) along the deck line, cut off the excess mortar.
If the radius of the zygomatic rounding is constant, then practically only one template will be needed. I made a template for each section.
It is possible to obtain the bottom lift specified in shp. 1 and 3, for example, by placing an appropriately aligned board under the template or by lifting the edge of the cemented model.
It is necessary to test the «docking» of models of all sections laid in order on a flat area. At the same time, all violations of the general shape of the case are revealed, which immediately need to be corrected. If this requires applying an additional layer of mortar, then the cement that has already seized should be well moistened with water.
For the final finish, the entire surface of the model, including the end walls, was pasted with two layers of newsprint. Mastic for rubbing the floor («edelvax») was used as a separating layer.
Cement models of boat sections are light enough (they can be turned by one person) and durable, but it is necessary to protect them from strong impacts.
Forming sections. A few words about safety. If the work is done indoors, ventilation is necessary. For example, I will mention that my fan (50 watts) installed in the window was turned on every hour for 15 minutes. Just once I ignored this rule and paid for a severe headache.
To make it easier to wash hands of resin, it is useful to lubricate them with a composition that dries in the form of a thin protective film. You can prepare such a composition yourself according to the following recipe: casein — 100 parts by weight, ammonia (pharmacy) — 600 V. h., soap — 100 V. h., vaseline — 60 V. h., water — 500 V. h. Casein dissolves in ammonia, water is added, soap in pieces and vaseline. In extreme cases, you can lubricate your hands with vaseline.
In the technical manuals, it is recommended to anneal the fabric at 200-250 °C before pasting or to wash it from the oiling agent in acetone. I have not tried to wash, but I do not recommend annealing at home (the fabric becomes stiff, fiberglass layers, bubbles appear). It is quite enough to warm up the fabric slightly in the oven to evaporate the moisture.
The resin is best measured by level in a glass half-liter jar. With sufficient accuracy, it can be assumed that for 300 cm of the mixture (resin ED-6 plus plasticizer — dibutyl phthalate), 30 cm of the hardener — polyethylene polyamine should be added. The exact composition of the binder when using epoxy resin is as follows: resins of 100 weight parts, polyethylene polyamide 15-20 V. h., dibutyl phthalate 8-10 V.h.
If polyester resin PN-1 or PN-3 is used, then 100 V. h. of resin must be mixed with 8 V. h. of cobalt naphthenate (10% solution in styrene) and add 3 V. h. of hyperiza as a hardener.
To obtain a durable housing, it is quite enough to lay 4 layers of fabric with a thickness of 0.27-0.35 mm. A thin satin weave fabric is preferable, which is better impregnated with a binder. It is better to color the fabric for each section in advance, so as not to forget how many layers have already been pasted. When cutting, it is necessary to leave 35 mm at each end of the section for bending on the bulkheads; in order not to form folds, triangular notches should be cut along the edge. I cut out pieces of fabric for bulkheads with a small allowance around the perimeter, removed locally — after gluing, but before curing the resin. The binder was evenly smeared with a layer 0.5-2 mm thick, acting with a metal plate with an evenly sawn edge, and then laid fiberglass, rolled it and pierced with the end of the brush. To improve the impregnation of the fabric, you can warm it up — iron it through tracing paper or cellophane with a hot iron (80-100 °C), from which the resin is liquefied; you need to remove the tracing paper or cellophane in time before the resin begins to harden. If a bubble has formed under the fabric, it must be removed by puncturing the fabric with an awl. The last layer of fabric should not be ironed: a decorative layer of resin with pigment will not fit well on the resin that has emerged from the fabric and hardened. If it was not possible to glue all four layers in one day, the surface of the last layer of fabric should be protected from contamination. It is better if there is no resin layer on it, since after curing it has a «glass» surface that will have to be sanded.
After drying at room temperature for two days, the section can be removed from the dummy. In principle, it is enough to separate the bulkheads and sides from the surface of the model with a thin metal ruler, but if the separation layer was applied poorly, you may have to destroy the model.
The molding of the sections of the covers of removable decks with bulwarks was carried out on separate cement molds assembled in ready-made sections of the hull. Along the upper edge of the bulwarks, a foam rack is molded for rigidity.
Molding of the deck cover section with bulwark
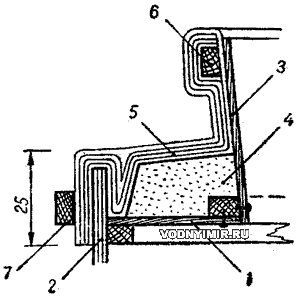
1 — plywood base in the shape of the deck (in plan), inserted into the hull section; 2 — the side of the kayak; 3 — the bulwark pattern along the edge of the cutout in the deck; 4 — cement form (do not forget to take into account the loss of the deck); 5 — layers of fiberglass; 6 — foam; 7 — a rack pressing the molded edge of the deck «lock» to the side until the resin is completely cured.
Finishing. After all sections are removed from the model, the housing must be assembled for final finishing by connecting the sections with bolts at the upper corners of the bulkheads. All large irregularities of the outer surface are filed with a rasp and cleaned with a skin, seal the depressions with pieces of fiberglass. If, during the manufacture of models, a height allowance was laid to simplify molding in the area of the edges, then it is necessary to outline the line of the upper edge of the side (LB) and remove the allowance with a hacksaw.
I advise you to apply a decorative layer, gradually trimming — turning the case to avoid resin stains, which are quite difficult to remove.
Installation of locks. The lock for connecting adjacent sections consists of two L-shaped composite strips coming one after the other, riveted along the perimeter of the bulkheads of each section (except for the upper edges). The lock prevents the displacement of the sections in the longitudinal and transverse directions, and the vertical displacement is prevented by two M6 locking bolts with wing nuts, with which the sections are tightened at the corners — at the deck (holes drilled during trial docking are used).
The lock device between the sections of the kayak
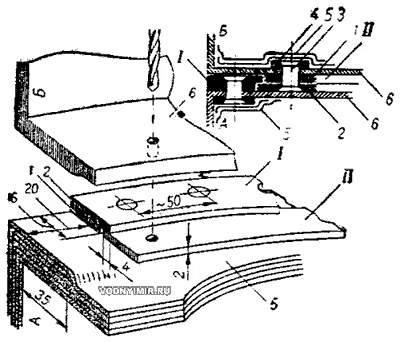
I — external lock on the section L; II — internal lock on section B.
The moment when the drill marks the correct position of strip 2 relative to section B and the lock as a whole is shown; lock I is riveted.
1 — gasket («narrow» strip); 2 — lock strip; 3 — rivet, aluminum Ø5; 4 — washer (gasket); 5 — fiberglass gluing; 6 — bulkhead.
Deck cover lock
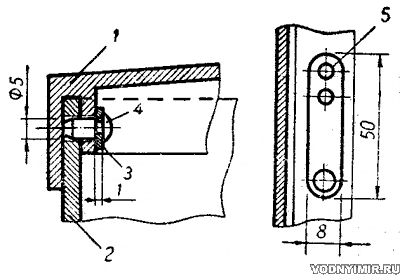
1 — the edge of the lid; 2 — the upper edge of the side; 3 — a flat spring; 4 — a locking pin at the end of the spring entering the hole in the side; 5 — a rivet.
The advantage of the recommended lock design is that the load on it is evenly spaced throughout the connection, and the locks practically do not increase the dimensions of the sections.
The strips for locks are cut from a sheet of light alloy with a thickness of 2 mm, carefully straightened and, after removing the burrs, adjusted one to another (in pairs). First, an external lock is installed and riveted to the bulkhead (I in the sketch). Then, in the groove — under the protruding edge of plate 2, plate 2 is wound from the inner lock II of the adjacent section. The first section (A) is placed vertically with the lock I up, and the adjacent section (B) is attached to it with two bolts. Now, from inside section B, two holes must be drilled through the bulkhead so that they fall on the ends of the plate 2 of the lock II.
The upper section B is disconnected. The plate 1 of the lock II is placed on the removed plate 2 and both parts are drilled through according to the marks made through the bulkhead. After that, the lock II is installed on the bulkhead of section B and fastened with two screws through the available holes. Now you need to check the correct joining of the sections and, if everything is in order, you can drill the remaining holes and rivet the lock II.
Duralumin washers or thin strips are placed inside the section under the embedded head of the rivets. After checking the quality of the riveting, the corners of the bulkheads are glued with strips of fiberglass in two or three layers.
Checking the operation of the lock, if necessary, expand the groove with a scraper or file the edges.
Kayak steering device
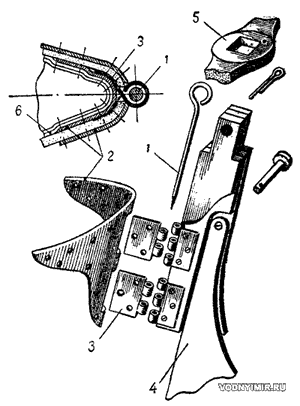
1 — pin Ø3; 2 — linings (external and internal) on the stern of the kayak, duralumin δ=1.5; 3 — mortgage loops; bend, rivet through with linings 2; 4 — rudder feather (duralumin δ=3) in a baller fork made of three layers of the same duralumin; 5 — tiller (crossbar); 6 — sealing gluing from the inside with two layers of fiberglass.
Boat projects for self-construction
Share this page in the social. networks or bookmark:
