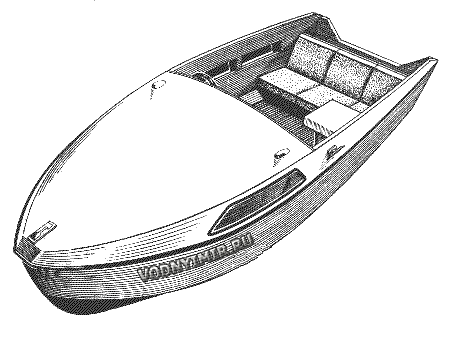
«Catfish» is a motor boat made of plywood. Construction of a boat by the «sew and glue» method

| Basic data of the motorboat «Catfish»: | |
|---|---|
| Longest length, m | 4,40 |
| Maximum width, m | 1,65 |
| Side height amidships, m | 0,80 |
| Empty motorboat weight, kg | 180 |
| Cabin height, m | 1,04 |
| Passenger capacity, people. | 4 |
| Recommended outboard motor power, hp | 8~25 |
Although the construction of a motor boat with plywood skin and a traditional hull design — with a transverse set and longitudinal bars along the grooves on the keel, cheekbone and along the upper edge of the side — is not too difficult, nevertheless certain skills, attentiveness and accuracy are needed for this. First, the builder will have to mark out the outlines of the frames in full size — to break the plaza, then assemble the frame frames or strong assembly patterns on the plaza, finally build a strong slipway, precisely put on it and align the entire transverse set, and then — a longitudinal set (keel, stringers, rest bars), remove the slats from the rails, and only after that, you can start fitting the outer skin sheets and installing them in place. In general, the work turns out to be quite time-consuming; it is required to occupy any assembly room for a long time, which can pose a problem for a city dweller.
Meanwhile, there is a simpler technological way of assembling small plywood boats that does not require the manufacture of a slipway and a large number of transverse frames or patterns — the construction of a boat by the «sew and glue» method. This method with the use of copper wire clips and fiberglass ribbons has been successfully tested by our amateur shipbuilders in the construction of small rowing and sailing boats (see, for example, description of the construction of a yacht ace) or «Crab» boats (see here) ). We suggest using the same «sew and glue» method to build a four-person motor boat.
The difference between this method of building boats by the «sew and glue» method from the traditional one is that the contours of the hull of the boat are obtained during its assembly thanks to pre-cut sheets of skin in a clean size, and the assembly of the hull consists in connecting these sheets along the edges. At the same time, it is not necessary to build a slipway — a flat floor surface or an outdoor platform is enough. The works themselves no longer require much art. The residence time of the housing during the assembly process in the room can be minimized. All blanks and parts can be stored in the apartment in a «flat form» and take the bulk shape of the vessel literally in 3-4 working days.
«Catfish» is a small cabin motorboat with moderately keeled bottom contours, which can be used for fishing trips or for weekend tourism. The «faceted» contours of the hull, made up of long sheets of outer skin and cabin coamings, make it possible to apply the above-mentioned stitching method and at the same time ensure sufficient rigidity of an almost non-assembled hull. The shape of the hull and strength are given by the cabin bulkhead, only one frame frame, transom, the design of the aft sofa and the engine niche. The sheets of the bottom are already supported by four stringer rails and intermediate floorings-supports for the flooring after the assembly of the cladding. This is necessary so that when swimming on a wave, the plywood bottom does not start working like a thin membrane: with constant repeated bends of the cladding plates, fiberglass joints along the grooves — along the keel and cheekbone — can, if not collapse, then lose tightness.
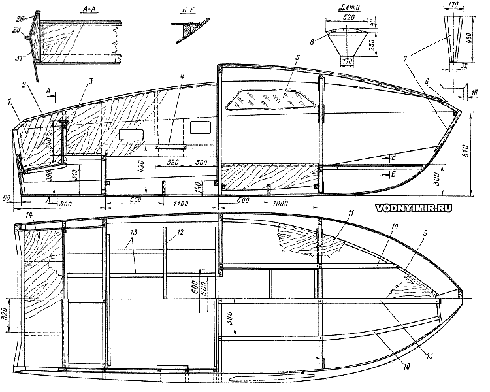
The design of the motor boat

zoom in
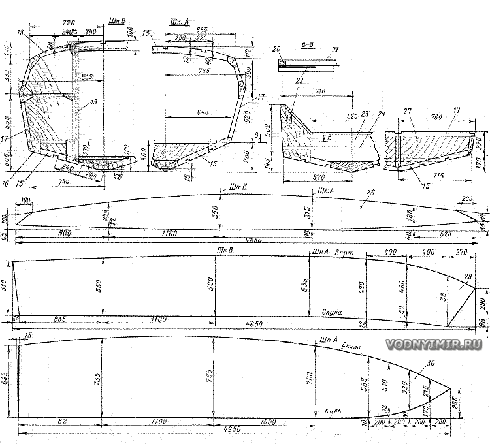
1 — internal stitching of the coaming and recess, δ=6; 2 — facing rail, 15x25, oak; 3 — rail 25x25; 4 — rail 25x30 steering seat mounts; 5 — plexiglass, δ=5~6; 6 — breshtuk δ=20, pine; 7 — stem, δ=24; 8 — beams 16x60; 9 — support rail 25x30; 10 — rail 16x32; 11 — bunk flooring, δ=4~6; 12 — flor 20x135; 13 — bottom stringer, 20x25; 14 — flooring of the engine niche; 15 — rail 16x55; 16 — knits, δ=6; 17 — rail 16x32; 18 — beams 16x55, glued together from nine rails 16x6; 19 — stand-door trim, 16x55; 20 — transom binding 32x32; 21 — transom, δ=8~12; 22 — the transom door, δ=6; 23 — engine board, 160x32; 24 — rail 25x25; 25 — collar 25x25, oak; 26 — rail 20x25; 27 — locker bulkhead, δ=4~6; 28 — cabin coaming, δ=6; 29 — the sheet of the side covering; 30 — the sheet of the bottom covering; 31 — the edge of the stitching, 16x75.

zoom in
For the cladding, it is desirable to purchase a five-layer (aviation) waterproof plywood with a thickness of 6 mm. It will take 14-15 of its sheets of standard sizes 1525x1525 mm.
The work begins with connecting all the blank sheets to the desired length. The best way is to glue the sheet with epoxy glue (or on another waterproof glue) «on the mind»; the necessary recommendations can be found in the book «15 projects of vessels for amateur construction» or, for example, in the article about the construction of the windsurfing «Flying Fish», published in «Boats and yachts» No. 82. Then, on the inside of each sheet, straight mutually perpendicular lines are applied to mark the contours according to the sketches given; these lines will also be necessary for monitoring during the subsequent assembly of the housing. Smooth curves of the edges can be drawn along the intended points using a thin flexible rail with a length of at least 3 m.
The sheets are cut along the edges with a hacksaw with a small tooth and shaken with a plane in such a way that when stitching the edges are joined with as little gap as possible; the planes of the ends of the plywood have to be cut «at an angle» (as shipbuilders say — to remove the edges from the edges).
Details of the transom, bulkhead and frame frame are cut out of the remnants of plywood sheets. When assembling the housing, these nodes play the role of transverse patterns.
The assembly begins with the connection of a pair of bottom sheeting sheets along the keel groove. Retreating from the edge of the keel by 6 mm, a line is drawn on both sheets, which will serve as a center for drilling holes for wire clips. First, the edges of the joined sheets are fastened after 75 mm. At the bow tip, where the mating edges form the stem line, it is better to reduce the step between the staples. In one of the connected edges, holes can be drilled immediately along the entire length, and in the edge of the second sheet, it is better to drill holes in place — sequentially, in sections of 500-600 mm long, otherwise, when bending the edges along a curved line, the distances between the holes may turn out to be mismatched.Paper clips are made of copper wire with a diameter of about 2 mm; after cutting pieces of wire about 40 mm long and bending them in the form of deep brackets, paper clips are inserted from the inside of the skin into the holes and the ends are twisted from the outside with pliers. At first, there is no need to try to bring the edges of the sheets being joined together too tightly — this will have to be done immediately before pasting the grooves with fiberglass.
The scheme of assembly of sheathing sheets on paper clips by the method of «sew and glue»

a — wire settling; b — the connection is ready for pasting with plastic; c — pasting the connection from the inside.
It is better to start setting paper clips from the stern, and when the paper clips stand at a groove length of 1-1.5 m, it is recommended to temporarily install the transom in place — it will help to give the bottom the right keel and get the correct longitudinal outline of the keel during further work. Later, it will also be possible to temporarily «bait» the cabin bulkhead and the frame frame in the bow of the boat. Having passed the entire keel groove in this way, you need to make sure that the contours and the tightness of the edges of the plywood are correct, tighten the wire in places where an excessive gap appears.
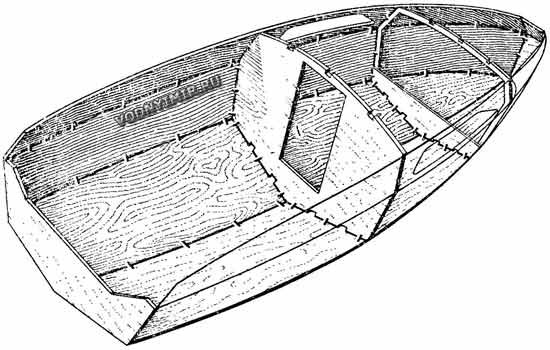
Housing in the process of assembly

Then both sheets of the side covering are put in place; they are grabbed to the exposed set using clamps, a strong cord and nails, and then their edges are connected to the edges of the bottom sheets along the cheekbone, working from the transom in sections of 500-600 mm alternately on both sides.
After fitting the brackets, the temporarily installed transverse set can be removed by first marking the position of the flores on the bottom lining, and the places of cutouts for the passage of longitudinal stringers on the flores. The blanks of the stringers are put in place on glue and nails hammered through the skin in a staggered manner for a secure fit of the rail to the skin throughout the formation. In the nose, where the bend turns out to be large, it is better to put rivets or screws.
Paper clips are rather mounting elements than fastening the skin sheets for the entire duration of the subsequent operation of the boat. Fiberglass gives the main strength to the joints, which is formed using thin fiberglass tapes glued with epoxy glue in several layers on both sides of the joint. To get a dense layer of fiberglass without air bubbles and peeling from the plywood, it is necessary to carefully sink the wire of the brackets into the wood, which protrudes from the inside of the housing in the form of «bridges» over the groove. This can be done with a hammer and chisel with a rounded chopping part or another similar tool; at the same time, the seam receives an additional seal.
The bonding of the joints begins from the inside of the skin. Before gluing the first fiberglass tape, it is useful to limit the width of the strip lubricated with a binder by applying adhesive tape on both sides of the groove. A pre-prepared binder (epoxy resin — 100 wt. h.; polyethylene polyamine — 10 wt. h.; dibutyl phthalate — 15 wt. h., or other components according to the instructions for using the resin available to the builders of the boat) is applied with a brush, then a dry fiberglass tape is applied. In this case, the tape is simply rolled out, but not stretched. From the outside, fiberglass is tapped with a brush soaked in a binder until the tape is evenly impregnated — it becomes transparent at the same time. Air bubbles must be carefully removed, otherwise they will subsequently cause plastic stratification and water filtration.
It is advisable to use a factory-made tape — it is widely used for insulation work. It is only necessary to check that the fiberglass does not turn out to be impregnated with an oiling agent; if it has high humidity, you will have to pierce the tape in the oven of the gas stove.
It is enough to apply three layers of tape on both sides of the skin to get an equally strong connection with plywood. If, when applying the first layer, the binder protrudes from the outside of the joint, this indicates a good impregnation of the joint. Layers need to be applied, slightly shifting to the side in relation to the previous one, so that a 10-15 mm overlap is obtained along the edge. If the tapes have to be cut from fiberglass themselves, you can make the upper layers wider in advance. The ends of individual pieces of tape should also be stacked with overlap.
When the fiberglass gelatinizes, you can remove the limiting adhesive tape and leave the case for a day until the joint is completely solidified.
The next stage of construction is the installation in place (on glue and screws) of a transverse set of hull and cabin coamings, which are connected to the upper edges of the side skin on paper clips in exactly the same way as already described.
The builder is given the opportunity to choose one of two design options for the bow tip of the boat above the waterline. You can either sew both edges of the sides with paper clips and not put any stem, or make a stem from a board, as shown in the drawing, and attach the bow edges of the sides to it with glue and screws. It all depends on whether the builder likes the blunted bow of the boat or he prefers to make it sharp.
Before gluing the grooves from the outside, you need to bite off the protruding wire twists with wire cutters as close as possible to the surface of the skin, and the remaining wire tips should be sawed level with the plywood. Then, a limiting adhesive tape is laid along the groove and fiberglass is glued as described above.
At the end of the design of all longitudinal connections, it remains to mount the entire structure inside the cabin and cockpit, and then draw it in place and put the roof of the cabin made of plywood 5-6 mm thick on paper clips. If there are difficulties with the bending of the roof, cut from one single sheet, it can be cut along the DP and connected on a longitudinal rail — a carlengse that supports the roof of the cabin.
Outside, it is recommended to paste over the bottom with a solid layer of fiberglass so that its edges pass to the sides slightly above the cheekbone. When processing all surfaces covered with fiberglass, it should be remembered that it is impossible to allow the removal of the resin layer and the exposure of fiberglass: in this case, glass filaments will begin to filter water through capillary channels between the fibers and the edges of plywood in joints closed with plastic on both sides will soon begin to rot. Therefore, such places should be carefully plastered with epoxy putty.
At the final equipment of the boat, one should not forget about such details as layouts that formalize the upper edges of the coamings in the cockpit, transom and bulkhead of the recess; shoulder straps on the sides; a metal strip on the stem (it is desirable to extend it along the entire length of the keel). In addition to decorative purposes, these parts protect the case from abrasion and impact, close the edges of the plywood from moisture penetration between the layers.
Boat projects for self-construction
Share this page in the social. networks or bookmark:
