Mini-boat «Argo-73». Cabin boat project for self-construction
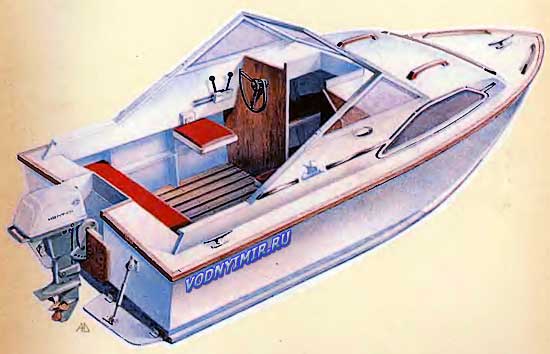
In recent years, the industry has produced several hundred thousand small vessels, so now buying a factory-built boat is not a problem. Nevertheless, at many parking lots among the «Kazanka» and «Progress», you can still see homemade boats. Moreover, if we talk about absolute numbers, the number of homemade crafts is increasing, not decreasing.
One of the reasons for this phenomenon is that the vast majority of factory boats do not have a cabin and therefore are not suitable for tourism purposes, especially on the rivers and lakes of the middle strip and the north of the country. On long hikes in the open the boat (even if there is a soft awning) a lot of time is spent on the daily fuss with the device and the folding of the overnight stay. It's hard to keep things dry. After each exit, you have to carry all the ship's property, including a heavy motor, into the locker. In a word, the open option has quite definite and significant disadvantages.
It cannot be said that the industry has not made attempts to create a planing boat with a closed cabin, however, even the «Progress-4L» has not yet received distribution, not to mention the expensive fiberglass «Nymph» and «Agate-4», which, apparently, did not go into the series at all.
These considerations caused the need to develop drawings of a closed boat specifically for self-construction. The project of the four-person boat «Argo-73» is another attempt to solve the problem of an inexpensive (and this means minimal size, made of plywood, with an outboard motor), but safe and relatively comfortable boat for «family» tourism.
 The publication of these drawings was preceded by the construction and testing of two boats very similar in design, «Argo-70» and «Argo-72», as well as a generalization of the experience of building other small vessels. The projects of all three «Argo» are based on the same idea. Tourist boats are usually used both for tourism itself (long-distance hikes during vacations) and for short-term walking trips on Saturday and Sunday. Accordingly, two loading options are clearly distinguished: walking (2-3 people, a tank of fuel and a little cargo; total, on average, 250 kg) and a tourist option (4 people, 2 cans and a tank, provisions, camping equipment; total 450-550 kg). With the boat's own weight of about 250 kg, the total displacement, taking into account the weight of the outboard motor and supply (another 50 kg), respectively, is about 550 and 850 kg. Such a sharp difference in displacement leads to the need to design the contours of the hull and choose its dimensions with the expectation of planing in the walking version and for movement in the transitional mode — in the tourist.
In the summer of 1971, the first experimental boat with an outboard motor «Moscow» with a capacity of 10 hp was tested. In the recreational version of the load, «Argo-70» went at a speed of about 18 km/h, in the tourist version — no more than 11-12 km/h. The boat, even without cargo, was very difficult to enter a mode close to planing, and immediately broke down on turns — a high specific load (40-50 kg/hp) affected.
The next version of the boat — «Argo-72» — was already designed with the expectation of a twice as powerful motor. During tests in the summer of 1972 with the «Whirlwind» and «Whirlwind-M» engines, both «Argo» developed in the walking version of loading up to 30 km/h, in the tourist version — 15-17 km/h.
| Basic data of the mini-boat «Argo-73» | |
|---|---|
| Longest length, m | 4,36 |
| Maximum width, m | 1,80 |
| Side height amidships, m | 0,78 |
| Body weight, kg | 240 |
| Estimated speed, km/h (approx.): | |
| with a displacement of 550 kg | 30-32 |
| with a displacement of 850 kg | 18-20 |
General location of the boat
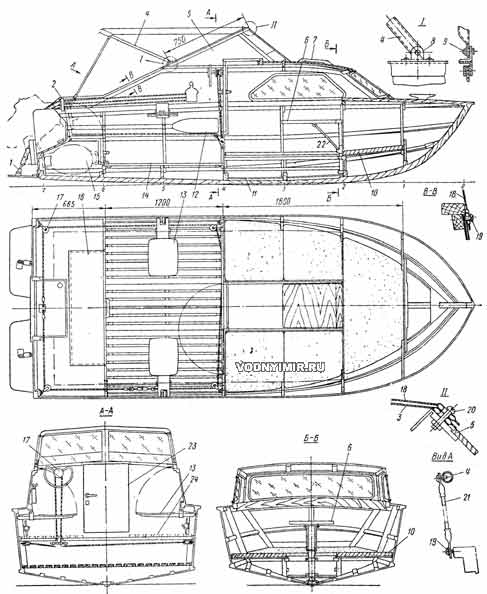
zoom in, 516 KB
1 — adjustable transom plate; 2 — bowden holder of the motor remote control system; 3 — awning; 4 — awning arc; 5 — windscreen; 6 — folding table; 7 — handrail; 8 — awning rim; 9 — M4 bolt; 10 — foam cushion; 11 — payoles in the cabin, plywood δ=6; 12 — paddle; 13 — folding seat; 14 — cockpit payoles, 12X60 rail; 15 — stern locker; 16 — locker cover; 17 — storm wiring unit; 18 — tent tent; 19 - 5x35 screw; 20 — M6 screw; 21 — shock cord to stretch the awning; 22 — table stand; 23 — cabin door; 24 — the position of the payoles when equipping the cockpit for the night.
The «Argo-73» drawings are designed with the expectation of installing an outboard motor of the same power of 20-25 hp and achieving at the same time slightly higher speeds — about 20 km/h with the largest displacement.
The high specific load (34-42 kg/hp) necessitated the use of flat-keeled contours with a low keeling of the bottom in the stern and a smooth rise of the keel line to the transom. The installation of adjustable transom plates is provided, which will allow you to select the most advantageous running trim in case of sudden changes in the displacement of the boat. The bow frames of the «Argo» are given a certain bulge, which is common for plywood hulls with surfaces unfolding to the plane and somewhat softening the course on excitement.
Theoretical drawing, table of plaz ordinates
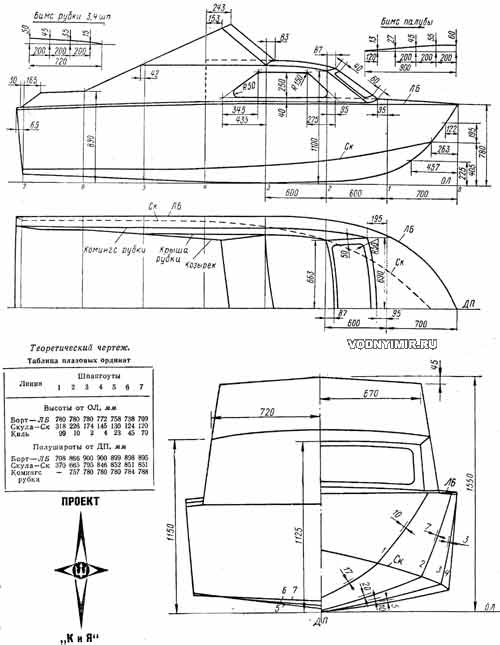
zoom in, 164 KB
The seaworthiness of the «Argo» is quite high: at a wave height of about a meter, both built boats freely walked all courses in relation to the running of the wave, maintaining a speed of up to 20 km/h. With a further increase in speed and movement against the wave, shocks were felt, which is quite natural, given the small angles of keeling of the bottom.
Thanks to the wooden hull, the «Argo» will not sink, even when completely flooded with water. The waterproof bulkhead on the shp. 4 will allow the boat to move independently while maintaining some minimum of seaworthiness. If foam blocks are fixed under the deck throughout the cockpit (with a cross section of 10x15 cm), «Argo» will fully meet the current requirements for unsinkability and emergency stability of industrial-built boats.
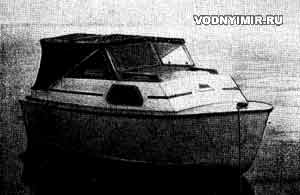 Despite the fact that «Argo» is shorter than «Progress» or «Kazanka-MD», it has a closed cabin with two permanent sleeping places, in which four people can freely sit at the table. On the move, the driver and one passenger are located in the cockpit on folding seats; two more passengers can sit on the lid of the aft locker. Thus, there are seats in the cockpit for all four crew members. The cockpit is protected from splashes by a developed windscreen. To protect from rain or hot sun, an awning is quickly installed over the cockpit. When making a bed for the night, an awning tent is stretched over this «running» awning, which turns the boat into a rather cozy «two-room» houseboat. To get two berths in the cockpit, it is enough to install the side parts of the poles at the level of the lid of the aft locker, intended for storing fuel, and in the parking lot and the motor. If necessary, the table in the cabin is removed, the poles are placed on the sofas and a sleeping place is obtained in the entire width of the boat.
Due to the small size, the «Argo» does not provide a latrine, a stationary galley, wardrobes; the height of the cabin does not allow you to stand tall in the cabin. However, the absence of all these amenities, in our opinion, is more than compensated by the simplicity of the design, the cheapness of the construction and operation of the boat.
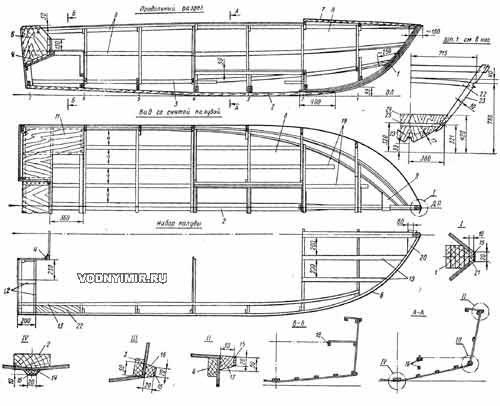
Structural drawing of the mini-boat hull
zoom in, 207 KB
1 — stem 50X50, glued from rails 5x50; 2 — keel 30x80; 3 — zygomatic stringer 20x40, glued from rails 10x40; 4 — square 3x30x30, light alloy; 5 — stitching of the engine niche, δ=5, plywood; 6 — side stringer and a halt beam, 20x40, glued of 10x40 rails; 7 — deck decking, δ=5; 8 — the lining of the side and bottom, δ=5, plywood; 9 — a brashtuk, made of 40x120 board; 10 — bottom stringer 20x40; 11 — the flooring of the locker, δ=5; 12 — rail 20x40; 13 — karlengs, 20x30; 14 — falshkil 10x40, oak; 15 — strip 2x20, light alloy; 16 — 20x30 rebound bar, glued from 10x30 rails; 17 — 30x30 collar, glued from 10x30 rails; 18 — strapping, 20x30; 19 — 20x40 deck railings; 20 — 40x120 brechtook; 21 — 10x40 stem lining, oak; 22 — 20x40 beams; 23 — flor and toptimbers, 20x40; 24 — sewing flora, δ=5; 25 — the support bar of the payola, 20x30.
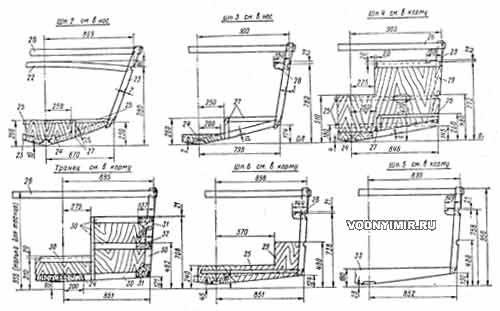
Frame frames
zoom in, 168 KB
Pos. 1-25 — see the specification for the structural drawing; 26 — shergen-plank, 20x40; 27 — rail 20x30; 28 — half-beam 20x40; 29 — bulkhead, δ=4; 30 — transom binding, 30x60; 31 — knits, δ=5; 32 — overlay made of plywood, δ=5; 33 — flor shp. 5, 20x160.
The hull set consists of seven frame frames connected by longitudinal ties — stringers, keel, privalny and zygomatic bars. All parts of the set are made of pine. The skin is made of water-resistant birch plywood with a thickness of 5 mm. It is advisable to glue the finished housing from the outside with two layers of fiberglass on epoxy resin; the thickness of the plywood skin can be reduced to 4 mm. All body parts are connected on a water-resistant adhesive (VIAM-BZ or epoxy).
The construction of the Argo, like any other vessel, begins with the breakdown of the plaza — drawing in full size the outer contours of the frame frames and transom, the inner contours of the stem and beams. Then, according to the plaza, templates are made from a 20x100 board for gluing blanks of beams on shp. 1 and 2, beams of the cabin and the stem. Pine slats (10x20 for beams and 5x50 for the stem) are coated with glue on both sides in turn and pressed on the template using clamps. (Do not forget to lay a separating layer — a plastic film between the template and the first rail.)
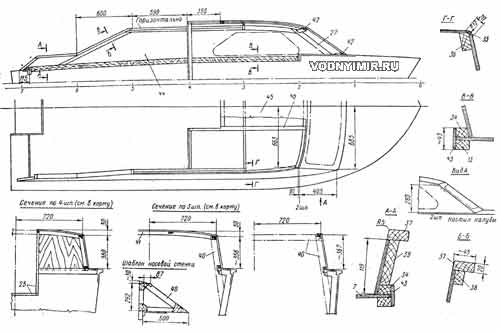
Boat cabin design
zoom in, 279 KB
Item 1-33 — see the design drawing and frame frames.
34 — a block of fastening of the cabin coamings, 20x30; 35 — a 10x20 bead, ash; 36 — shelf, 20x40; 37 — a coaming plate, 20x45; 38 — a 30x20 rail; 39 — filler, δ=20; 40 — temporary rack 20x40; 41 — beams of the cabin, 20x40; glue from 10x20 rails; 42 — 20x30 bar; 43 — cutout lining in the deck; 44 — coaming, δ=5; 45 — roof of the cabin, δ=4; 46 — rail 20x30.
The «Argo» uses a ladder-free frame design that allows the most efficient use of the internal volume of the vessel. To the plywood panels of the bulkheads, the strapping parts are attached to the glue with screws pressed in. Flor shp. 3 is pre-assembled on the knits. When installing screws, it should be borne in mind that cutouts — grooves for the passage of stringers will subsequently be cut out in the framework. All connections of bars with plywood are made with pressing with galvanized steel screws 4x20 mm, connections of bars between themselves — screws 5x35 mm.
The keel and stem are joined by a lock (the connection is on the mustache with glue and three M5 screws).
The hull is assembled on the slipway with the keel up. When installing the frame frames with shergen slats on the longitudinal beams of the slipway, it should be remembered that with our hull design, the theoretical plane of the frames passes in the plane of gluing the components of the frame. In the bow frames, the thicknesses of the fleurs go into the nose from the theoretical plane, and in the stern (starting from shp. 5) — into the stern.
Construction of the slipway
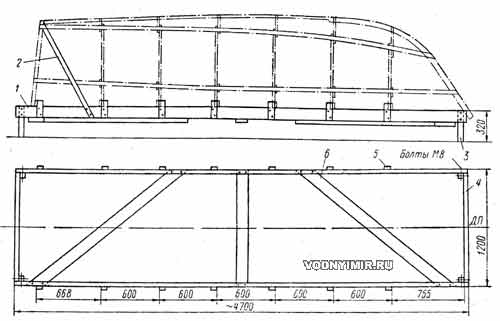
1 — longitudinal bars, 50x120x4700; 2 — slope, 20x40; 3 — rack, 50x50x320; 4 — transverse beam, 50x120x1100; 5 — bar for fixing the frame, 30x60; 6 — brace, 50x120.
The cutouts in the floras under the keel are malkuyut, after which the bookmark is installed on the glue with screws pressed. The heads of the screws are sunk into the keel so that it can be shaken during the subsequent forging of the set.
Due to their significant curvature in the bow, the rest bars have to be glued out of two 10x45 rails in place with screws pressed into the set, and clamps between the frames. The zygomatic stringers are similarly installed.
When malkovka with a small plane, all the outer surfaces of the set are touched to ensure a tight fit of the skin; the quality of malkovka is controlled by applying a cut of plywood with a length of at least 1.5 m. In those places where gaps have turned out, it will be necessary to stick a rail on the set and touch it again. After completing this work, install the side and bottom stringer. The bow ends of the side stringers are attached with screws to the stem without installing a brechtook. After shaking the outer surface of the stringers, the housing is ready for the installation of the skin.
The sheathing sheets connected in advance along the length are laid on the body, and all adjacent parts of the set are outlined from the inside with a pencil. The sheets are removed, holes for screws are drilled and cut into them (pitch 70 mm). According to the marking, glue is applied to those areas with which the plywood lies on the set; at the same time, the surfaces of the set themselves, adjacent to the skin, are smeared with glue. First, install and secure the sides with screws, then the bottoms. Due to the fact that the protective bars on the cheekbones have a significant curvature, it is advisable to glue them in place, laying the billet rails on top of the side covering, but before installing the bottom sheets (with clamps attached to the set).
By the time of removal from the slipway, it is necessary to prepare the keel blocks on which the hull will be stored on the shore in the future. The supports of the keel blocks should be located exactly under the sp. 2 and 6 and fit snugly to the skin. The support surfaces should have a width of at least 40 mm; they should be upholstered with canvas, laying a layer of felt.
The cockpit coamings and longitudinal bars of the locker crate in the wheelhouse are first installed on the keel-down hull (in order not to break the protruding free ends of the half-beams and transverse bars on the shp. 3). After that, the carlengs are attached in the bow, the aft locker and the under-engine niche are mounted, the deck deck is put and the cabin is assembled.
Boat projects for self-construction
Share this page in the social. networks or bookmark:
